Video Editor

Video Editor
Stage
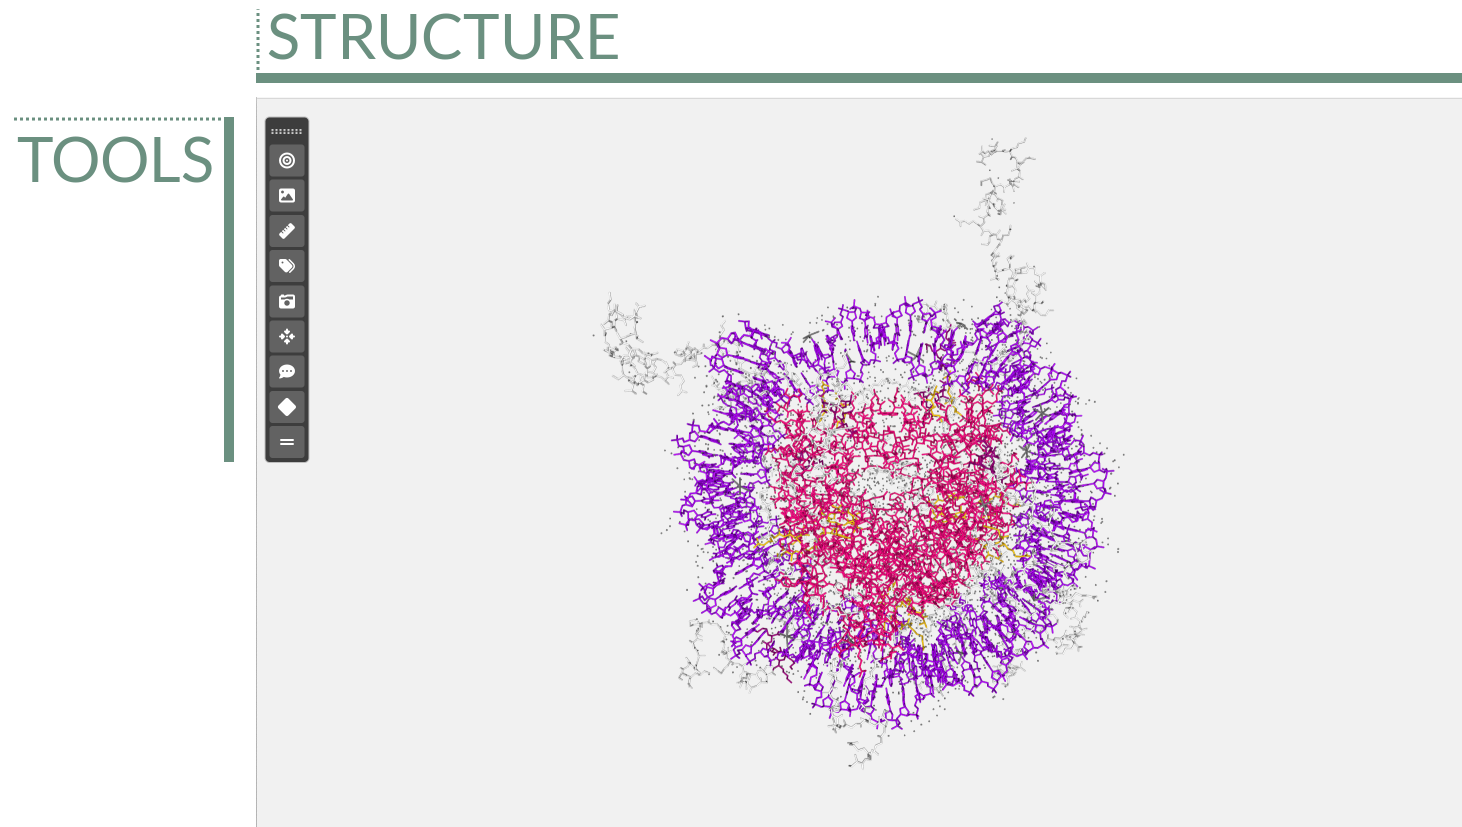
The stage is the area where the 3D biological structure is represented, the tools bar allows to apply actions to the stage.
Tools
The tools menu is at the top left of the stage and allows users to make some actions over it.

This menu is draggable around all the stage and can be collapsed / expanded by clicking twice on the handler. For hiding it completely, go to View > Tools in the menu. Click in the same menu for showing it again.
Center

Clicking this button centers the structure(s) position on the stage. This button is active only if one single keyframe of the timeline has been selected.
Background

Clicking this button opens a color picker that allows users to change the background color of the stage.
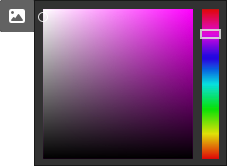
Click again on the button for hiding the color picker.
Measurements

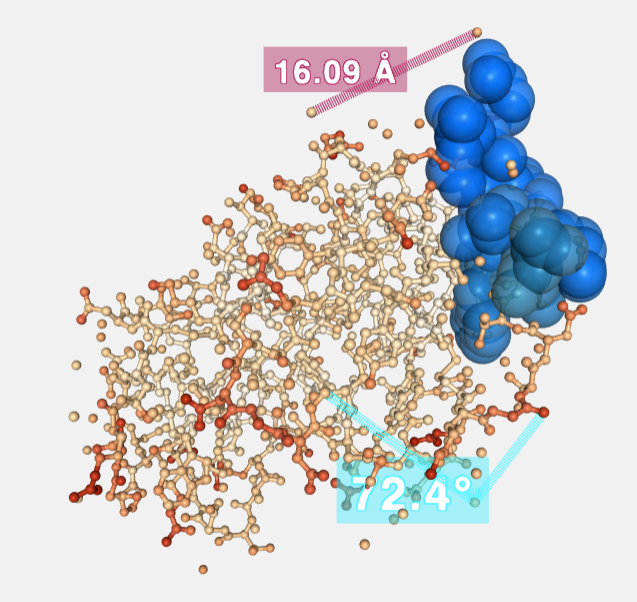
Clicking this button opens a modal dialog to edit the distances and angles created by users in the stage. For remembering how to draw them, please go to the Mouse click actions section.
Measurements with size and color by default:

Distances
Distances editor before editing size and color:
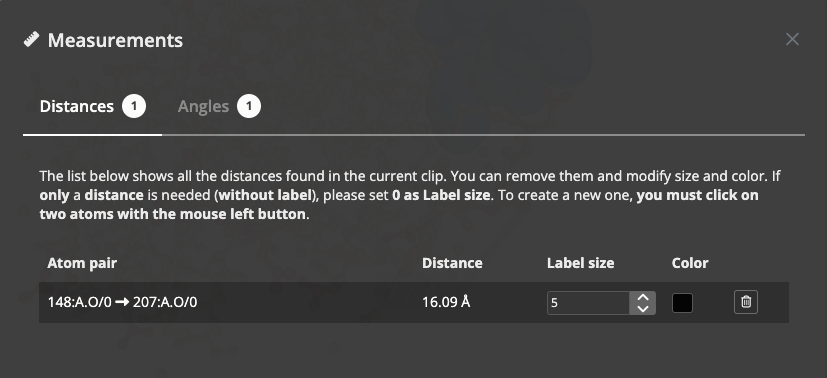
Distances editor after editing size and color:

If only a distance is needed (without label), please set 0 as Label size.
Angles
Angles editor before editing size and color:

Angles editor after editing size and color:
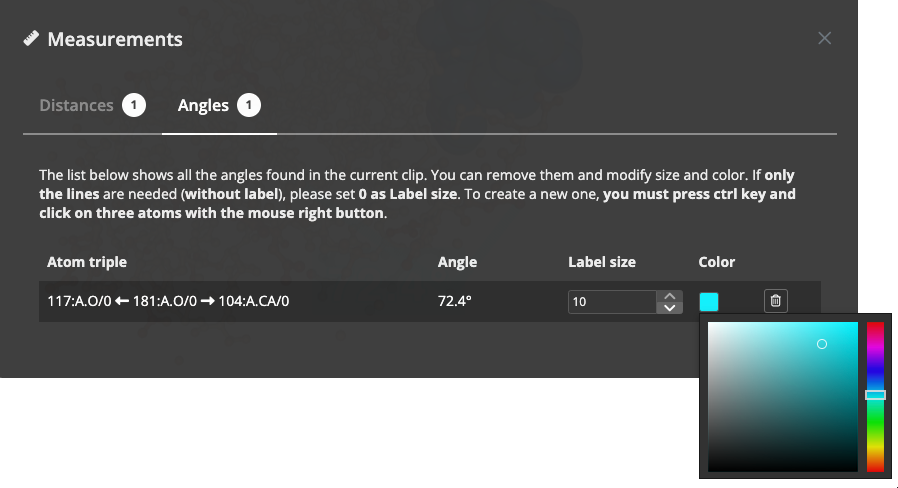
If only the lines are needed (without label), please set 0 as Label size.
Measurements after size and color edition:
Labels

Clicking this button opens a modal dialog to edit the labels created by users in the stage. For remembering how to draw them, please go to the Mouse click actions section.
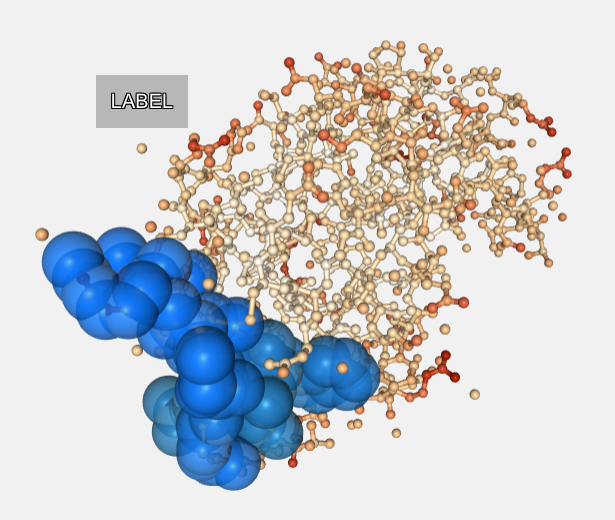
Labels with size, text and color by default:
Labels editor before editing text, size color and background:

Labels editor after editing text, size color and background:
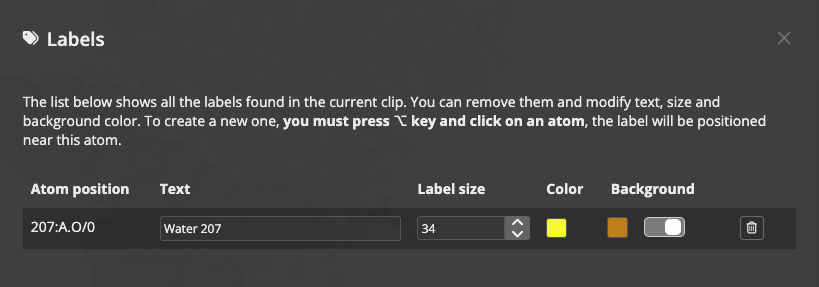
Label background can be modified. Moreover, it can be disabled as well with the switch beside the background color selector.
Labels after size, text and color edition:

Camera type

Switches camera type between orthographic and perspective.
Center view in atom

Click this button and then, select an atom of the structure, the view will be focused into this atom position. This button is active only if one single keyframe of the timeline has been selected.
Enable / Disable legend

Enables / disables a legend on the bottom right of the stage. This legend shows information for the molecule the mouse has hovered over in the next format:
Model number | Chain ID | Residue name (Residue long name) Residue number Atom name (or Bond)

Open keyframe editor

Clicking this button opens a keyframe editor.
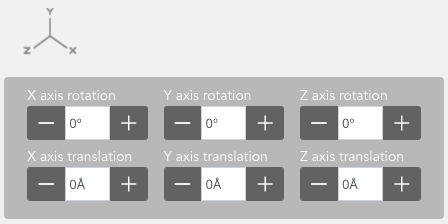
In this editor, users can change the rotation and translation of the biological structure.
This button is active only if one single keyframe of the timeline has been selected.
Enable / Disable letterboxing

Enables / disables letterboxing on the stage. Two stripes will appear showing to the user which parts of the stage will be rendered and which not in case of Creating a New Movie. In some cases (when the screen aspect ratio is 16:9) these stripes won’t appear.

Click again on the button for removing the stripes from the stage.
Structure Stage

The stage covers the main part of the screen. In the stage the structure is loaded and represented, and users can interact with it in several ways.
Zoom / Drag
Before applying rotation, translation or zoom to the stage, a keyframe must be selected in the timeline.
Actions of zoom in and zoom out can be done with the scroll mouse or the trackpad of a laptop, besides, rotation and translation can be applied as well:
Clicking on the stage with the left button and dragging will rotate the view.
Clicking on the stage with the right button and dragging will translate the view.
Mouse wheel (or using the trackpad with two fingers) on the stage will zoom in or zoom out.
All these modifications in the general orientation of the structure will be applied to the selected keyframe. That means that, in a clip, the first and the last frame can have different rotation, translation or zoom. Biomovies will take care of the interpolation between frames.
Mouse actions
Mouse over actions
Passing the mouse over the molecules of the structure will highlight them and show their information in the legend on the bottom right of the stage. Click here to see how to enable the legend.
Mouse click actions
Clicking with the mouse left button on an atom while pressing the Alt or ⌥ key will place a Label close to this atom. Click here to see how to edit labels.
Clicking consecutively on two atoms with the mouse left button will draw and calculate the distance in ångströms between these two atoms. Click here to see how to edit distances.
Clicking consecutively on three atoms with the mouse right button while pressing the Ctrl key will draw and calculate the angle in degrees between these three atoms. Click here to see how to edit angles.
Timeline

The Timeline, placed at the bottom part of the application, allows the users to control and edit the clips and the keyframes that shape the representation.
Timer
Placed at the top left corner of the Timeline, indicates the exact time where the cursor is.
Create new timeline item
This menu allows to create new items in the timeline:
Clip
Creates a new clip in the timeline. Note that for creating a new clip an existing one must be selected. The new clip will be added after this selected clip. If there is not enough space, the new clip will be added at the end of the timeline.
Shortcut: ⌘/Ctrl + ⇧ + C
Cloned Clip
Clones an existing clip from the timeline. Note that for cloning a new clip an existing one must be already selected in order to clone it. The new clip will be added after this selected clip. If there is not enough space, the new clip will be added at the end of the timeline.
Shortcut: ⌘/Ctrl + ⌥/Alt + C
Transition
Creates a transition between two clips. Two consecutive keyframes of different clips with a minimum gap of 400ms between them must be selected before performing this action.
Shortcut: ⌘/Ctrl + ⇧ + T
Fade In
Creates a Fade In transition before a clip. The initial keyframe of the clip must be selected before performing this action. There must be a minimum gap of 480ms between the previous keyframe and the one selected.
Shortcut: ⌘ + ⇧ + I for macOS, Ctrl + Alt + I for Windows / Ubuntu
Fade Out
Creates a Fade Out transition after a clip. The final keyframe of the clip must be selected before performing this action. There must be a minimum gap of 480ms between the next keyframe and the one selected.
Shortcut: ⌘/Ctrl + ⇧ + O
Description
Creates a new description in the timeline.
Shortcut: ⌘/Ctrl + ⇧ + D
Timeline menu

In this menu, divided into four areas, there can be found all the possible actions to apply to the Timeline.
Remove

The remove button allows the user to remove the selected clip or transition. For the sake of security, the button must be clicked twice.
Timeline controls
This submenu has the actions for controlling the Timeline area.
Reset timeline

Clicking this button resets the Timeline editor: disables the Pan Mode (if enabled), resets the Zoom to the initial value (if changed) and moves the cursor to the beginning.
Shortcut: ⌘/Ctrl + ⌥/Alt + R
Pan mode

Clicking this button enables / disables the Pan Mode, which allows to drag the whole Timeline editor.
Shortcut: ⌘/Ctrl + ⌥/Alt + A
Zoom

Clicking this button enables / disables the Zoom Mode, which allows to zoom into the Timeline editor.
Shortcut: ⌘/Ctrl + ⌥/Alt + Z
Tips: Once the zoom mode is enabled, the default zoom type is Zoom In. For doing Zoom Out, click ⌘/Ctrl. Zoom can be applied as well just clicking Ctrl (any OS) and scrolling the mouse wheel.
Keyframes actions

This submenu has the actions for controlling the keyframes of the Timeline.
Align last keyframe

Only works with two keyframes selected: aligns the last keyframe of the selection with the first one.
Shortcut: ⌘/Ctrl + ⌥/Alt + ⇧ + ◄ / Left for macOS / Windows, Ctrl + Left for Ubuntu
Align first keyframe

Only works with two keyframes selected: aligns the first keyframe of the selection with the last one.
Shortcut: ⌘/Ctrl + ⌥/Alt + ⇧ + ► / Right for macOS / Windows, Ctrl + Right for Ubuntu
Select all keyframes

Clicking this button select all the keyframes of the Timeline editor.
Shortcut: ⌘/Ctrl + ⇧ + K
Associate transition to clip

This button has the purpose of associating an existing transition with a clip different than the one that it was initially associated with.
For example, we create a transition between two clips, then we decide to move or remove one of the two clips and instead of it, generate a new one and associate with the transition. Just selecting both neighboring keyframes (one for the clip and the other for the transition) and clicking the button will reassociate them and dissociate the transition with the initial clip.
Shortcut: ⌘/Ctrl + ⇧ + A
Move keyframes left

Only works with two or more keyframes selected: moves all the selected keyframes to left in the Timeline editor.
Shortcut: ⌘/Ctrl + ⇧ + ◄ / Left
Move keyframes right

Only works with two or more keyframes selected: moves all the selected keyframes to right in the Timeline editor.
Shortcut: ⌘/Ctrl + ⇧ + ► / Right
Player

This submenu has the actions for controlling the cursor of the Timeline.
Go to first frame

Clicking this button moves the cursor to the first frame of the Timeline.
Shortcut: ⇧ + ▲ / Up
Go to previous frame

Clicking this button moves the cursor to the previous frame in the Timeline.
Shortcut: ⇧ + ◄ / Left
Play / Pause

Clicking this button plays / pauses the Timeline.
Shortcut: ⇧ + P
Go to next frame

Clicking this button moves the cursor to the next frame in the Timeline.
Shortcut: ⇧ + ► / Right
Go to last frame

Clicking this button moves the cursor to the last frame of the Timeline.
Shortcut: ⇧ + ▼ / Down
Trajectory frames

Only when working with a trajectory, this section appears at the top right corner of the Timeline. It indicates in the first place the position of the cursor and the total frames of the trajectory, and in the second place, between brackets, the range of frames with which the trajectory will be played. Click here to see how to select this range in the Trajectory editor. So, in the above image, the cursor is in the frame number 3792 of a total of 10000 for the whole trajectory, but only the frames between the 3602 and the 6563 will be played.
Cursor / Total frames [ initial range frame - final range frame ]
Main structure

In the first row of the Timeline, the main structure can be edited creating / modiying new clips and transitions.
Descriptions

In the second row of the Timeline, Descriptions can be introduced. They can be treated and edited as clips with their corresponding keyframes.
Timeline editor

The main timeline area or editor, is the place where all the actions related to Timeline such as select clip / transition, move them, select keyframes and so on.
Tips
For selecting a clip, click with the left mouse button on the clip clicking Ctrl (for any OS) at the same time.
The timeline zoom can also be applied via scroll mouse or trackpad and pressing the Ctrl key at the same time.
Multiple keyframes can be selected just clicking and dragging over the Timeline Editor.
For more tips, see the tips section.
Representations
The Representations panel is located at right of the stage and is used for:
Changing the representation properties of the structure selecting a clip or a keyframe in the Timeline. That means that each clip can have different representations.
Modifying the settings of a trajectory for each selected clip or keyframe in the Timeline. That means that the trajectory can have different settings for each clip.
Adjusting the features for each selected description text in the Timeline. That means that each description text can have different features.
Representations for clips and Trajectory settings
Description settings
Keyframes / Clips
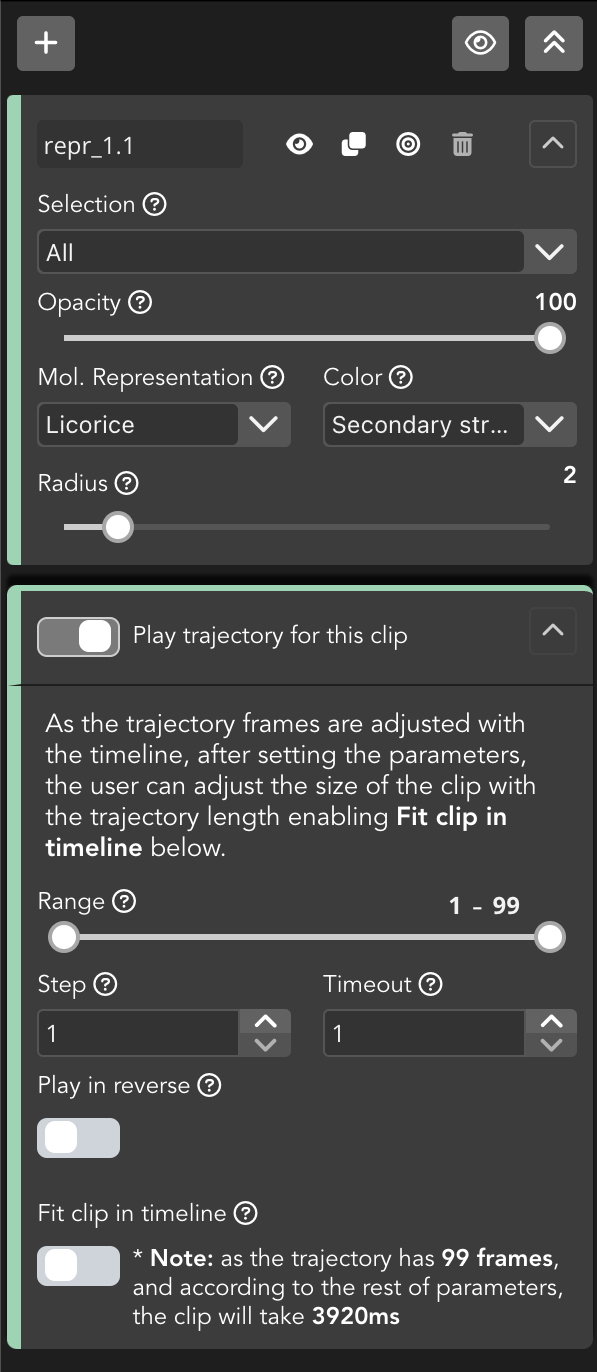
When selecting a clip or a keyframe in the Timeline, the above editor module appears on the Representations area.
Menu
This menu is common for all the representations of the selected clip.
Create new representation

Clicking this button will create a new representation for the structure in the selected clip.
Hide all

Clicking this button will hide in the stage all the representations for the structure in the selected clip.
Collapse all

Clicking this button will collapse all the representations editor modules for the structure in the selected clip. It doesn’t affect the representation.
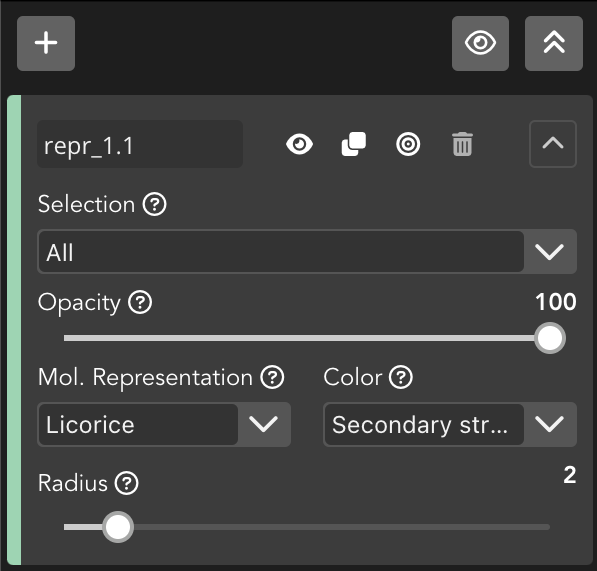
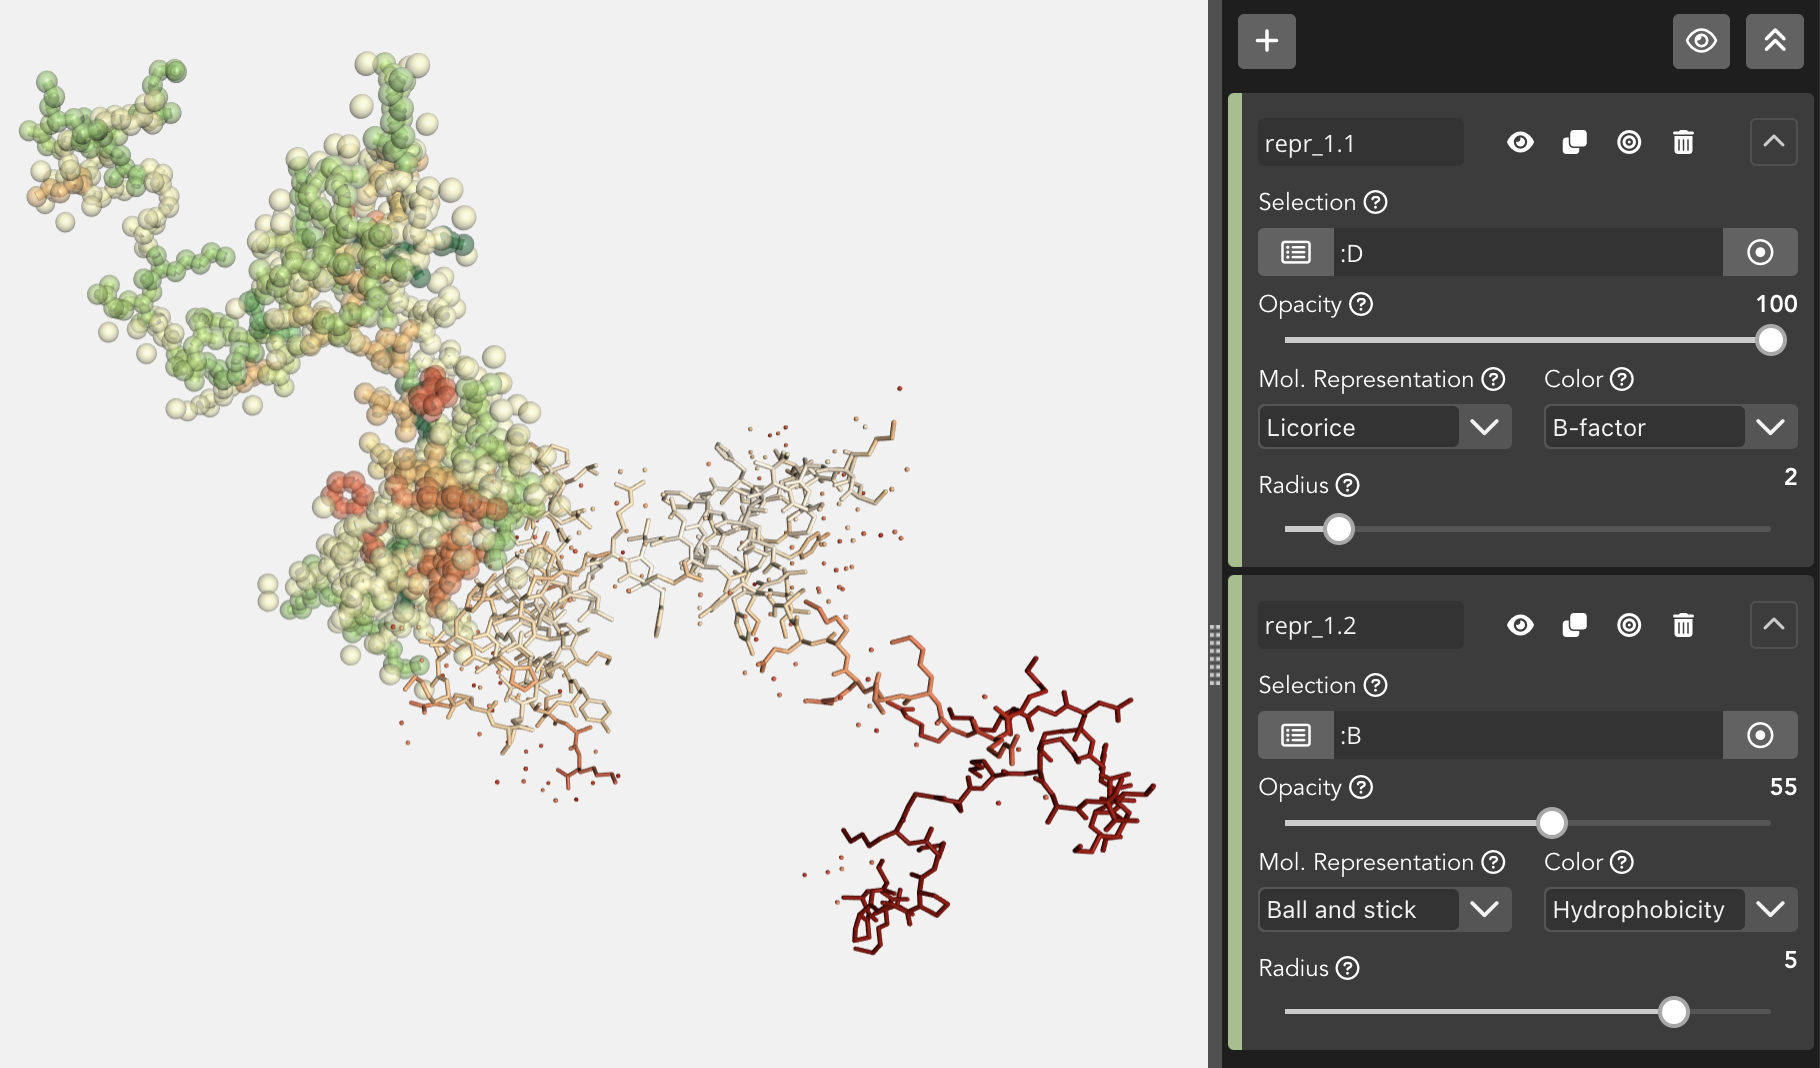
Edit representation
Each time we click the Create new representation a new representation is created and, therefore, a new Edit representation module is added. Each one of these representations are applied to the selected clip. For applying different representations to a different clip, click on this other clip in the Timeline.
Representation menu

The first line of the editor holds several actions related with the representation.
Representation name

Clicking this box allows to edit the name of the representation.
Hide representation

Clicking this button will hide this representation in the stage.
Clone representation

Clicking this button will clone this representation.
Center in this representation

Clicking this button will center the stage view in the molecules selected in this representation.
Remove representation

Clicking this button will remove completely this representation.
Collapse representation editor

Clicking this button will collapse this representation editor. It doesn’t affect the representation.
Selection
The Selections are used for applying molecular selections to the selected representation.
Standard selection
By default, Biomovies provide a list of predefined selections:
All
Side Chain
Side Chain Attached
Backbone
Protein
Nucleic
RNA
DNA
Hetero
Ligand
Ion
Saccharide / Sugar
Polymer
Water
Hydrogen
Helix
Sheet
Turn
Small
Nucleophilic
Hydrophobic
Aromatic
Amid
Acidic
Basic
Charged
Polar
Non Polar
Cyclic
Aliphatic
Bonded
Ring
Custom selection
Additionally, a custom selection is provided as well. When selected, the dropdown menu described below changes to a new structure:

The custom selection is divided into three sections:
Back to standard selection button

Clicking this button backs to the dropdown menu with the list of predefined selections.
Selection input text
In this text field, users can add a custom selection written in NGL viewer Selection Language . Please visit the Selection language section of the NGL Viewer manual before starting with this section.
Two different chains selected via custom selection
Distance-based selection button

When clicked, gets the atoms that are within a certain distance of the selection.

It adds two new fields as well: Whole residues and Distance.

Common custom selection: all the molecules of the chain D are represented
When clicking this button, all the atoms that are within a certain distance of the selection will be given instead of the selection itself.

Distance-based custom selection: all the atoms within a distance of 7Å of the chain D are represented
If the Whole residues switch button is enabled, all the molecules that have at least one atom within a distance of the selection will be given instead of the selection itself.

Distance-based custom selection: all the molecules that have at least one atom within a distance of 7Å of the chain D are represented
Opacity
Through this slider, the opacity of the representation varies. Note that due to an incompatibility of NGL Viewer, opacity in multilayer projects can generate some issues. So creating multiple representations with different degrees of opacity can give non desired outcomes.
Molecular representation
The structure can be displayed using a variety of molecular representations:
Backbone
Cylinders connect successive residues of unbroken chains by their main backbone atoms, which are .CA atoms in case of proteins and C4’/C3’ atoms for RNA/DNA, respectively.
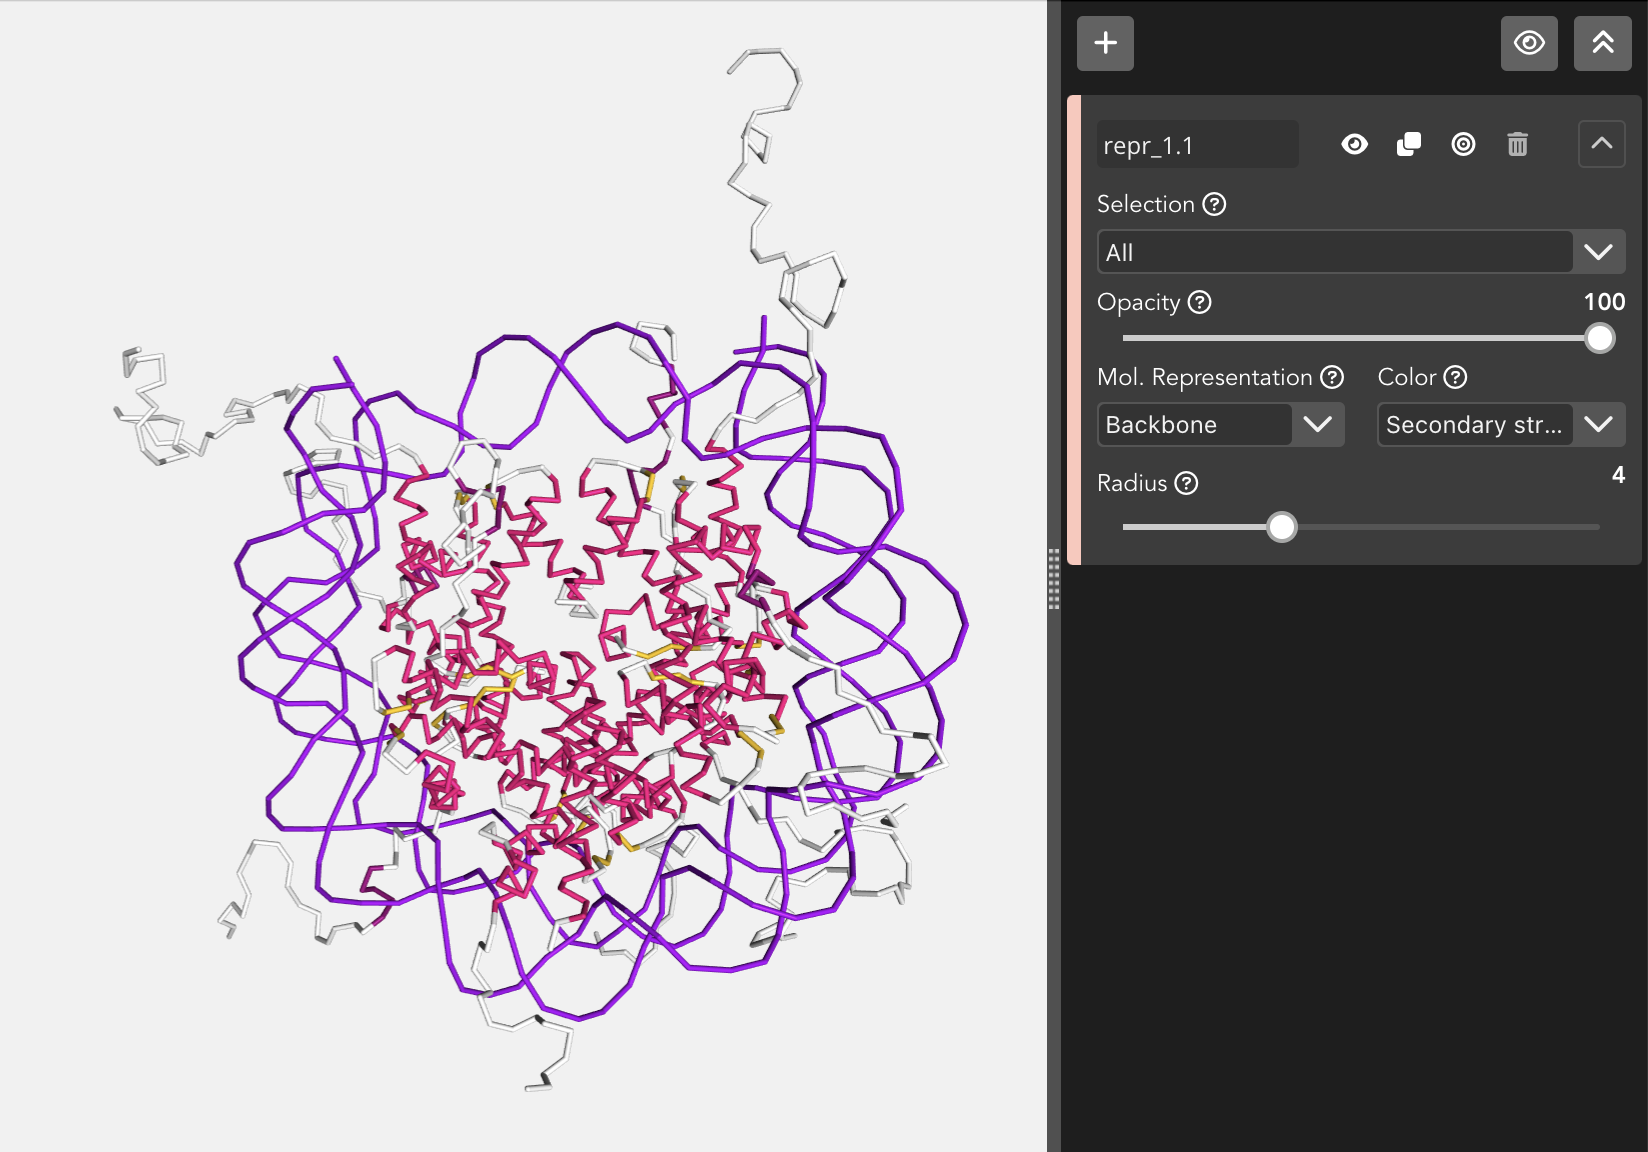
The Backbone representation allows to modify the radius of the backbone.
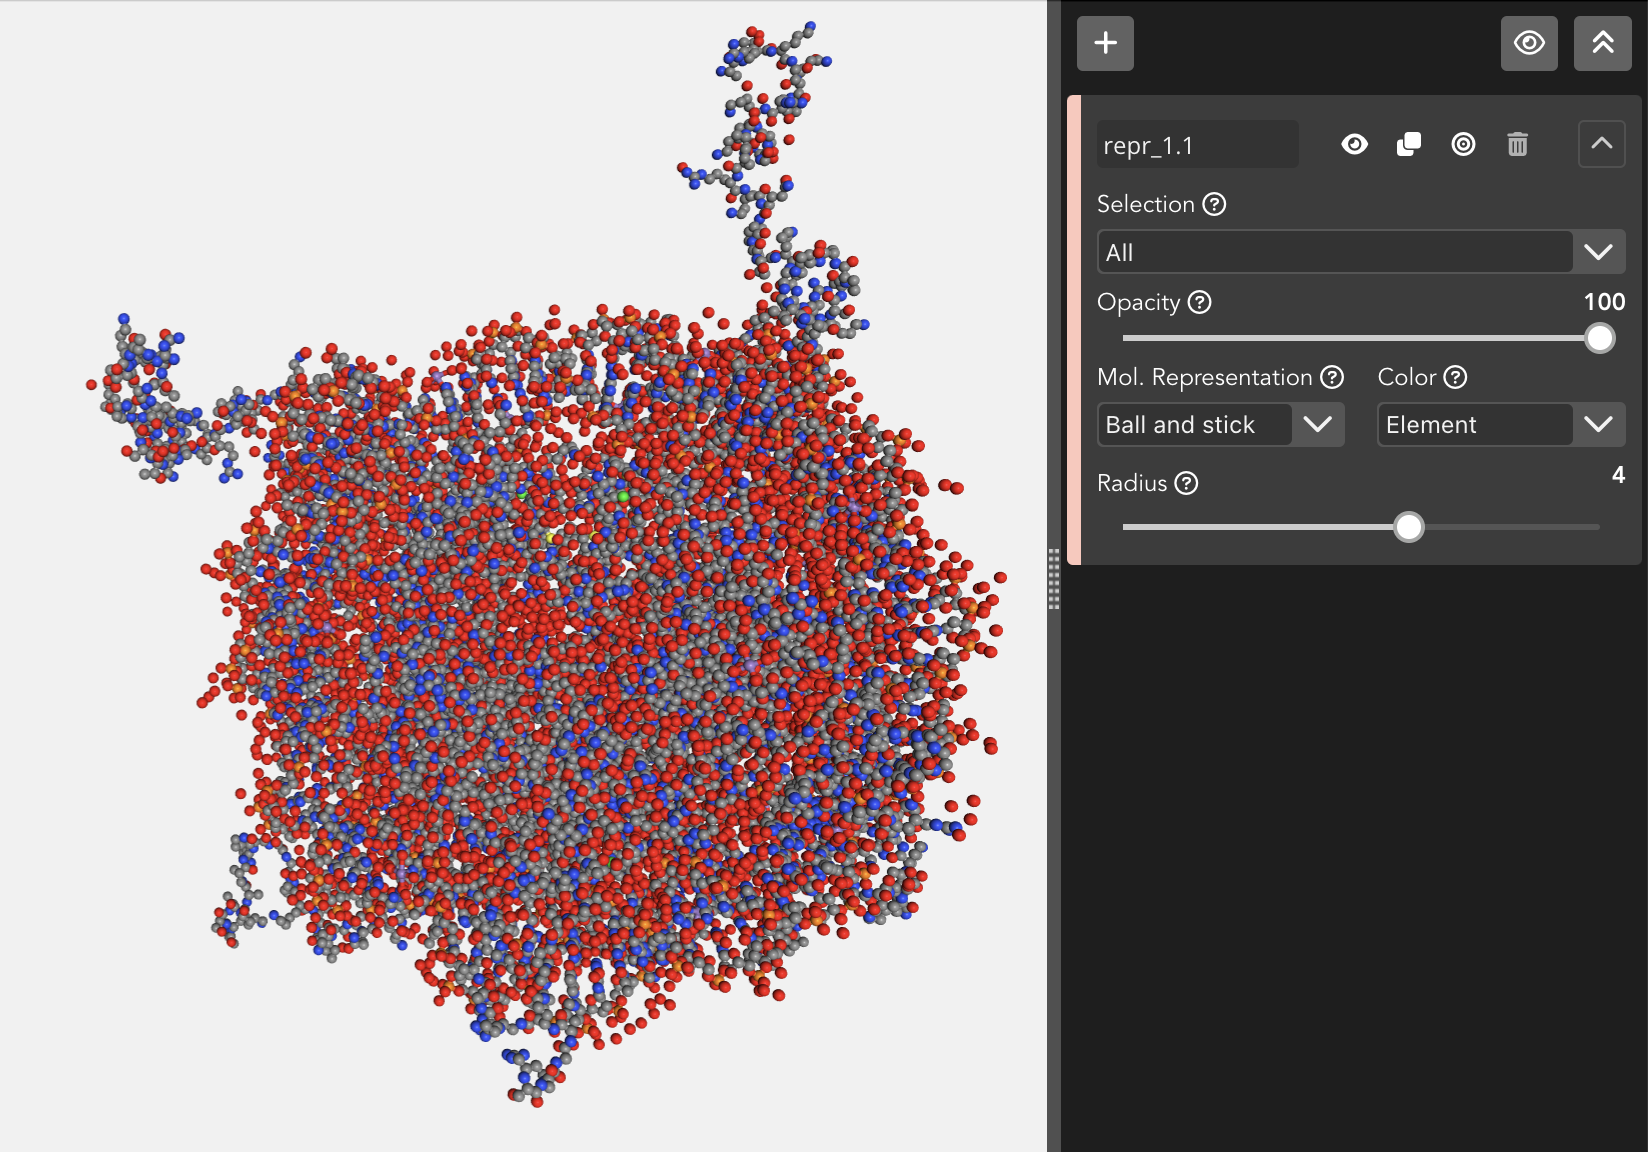
Ball and stick
Atoms are displayed as spheres (balls) and bonds as cylinders (sticks).
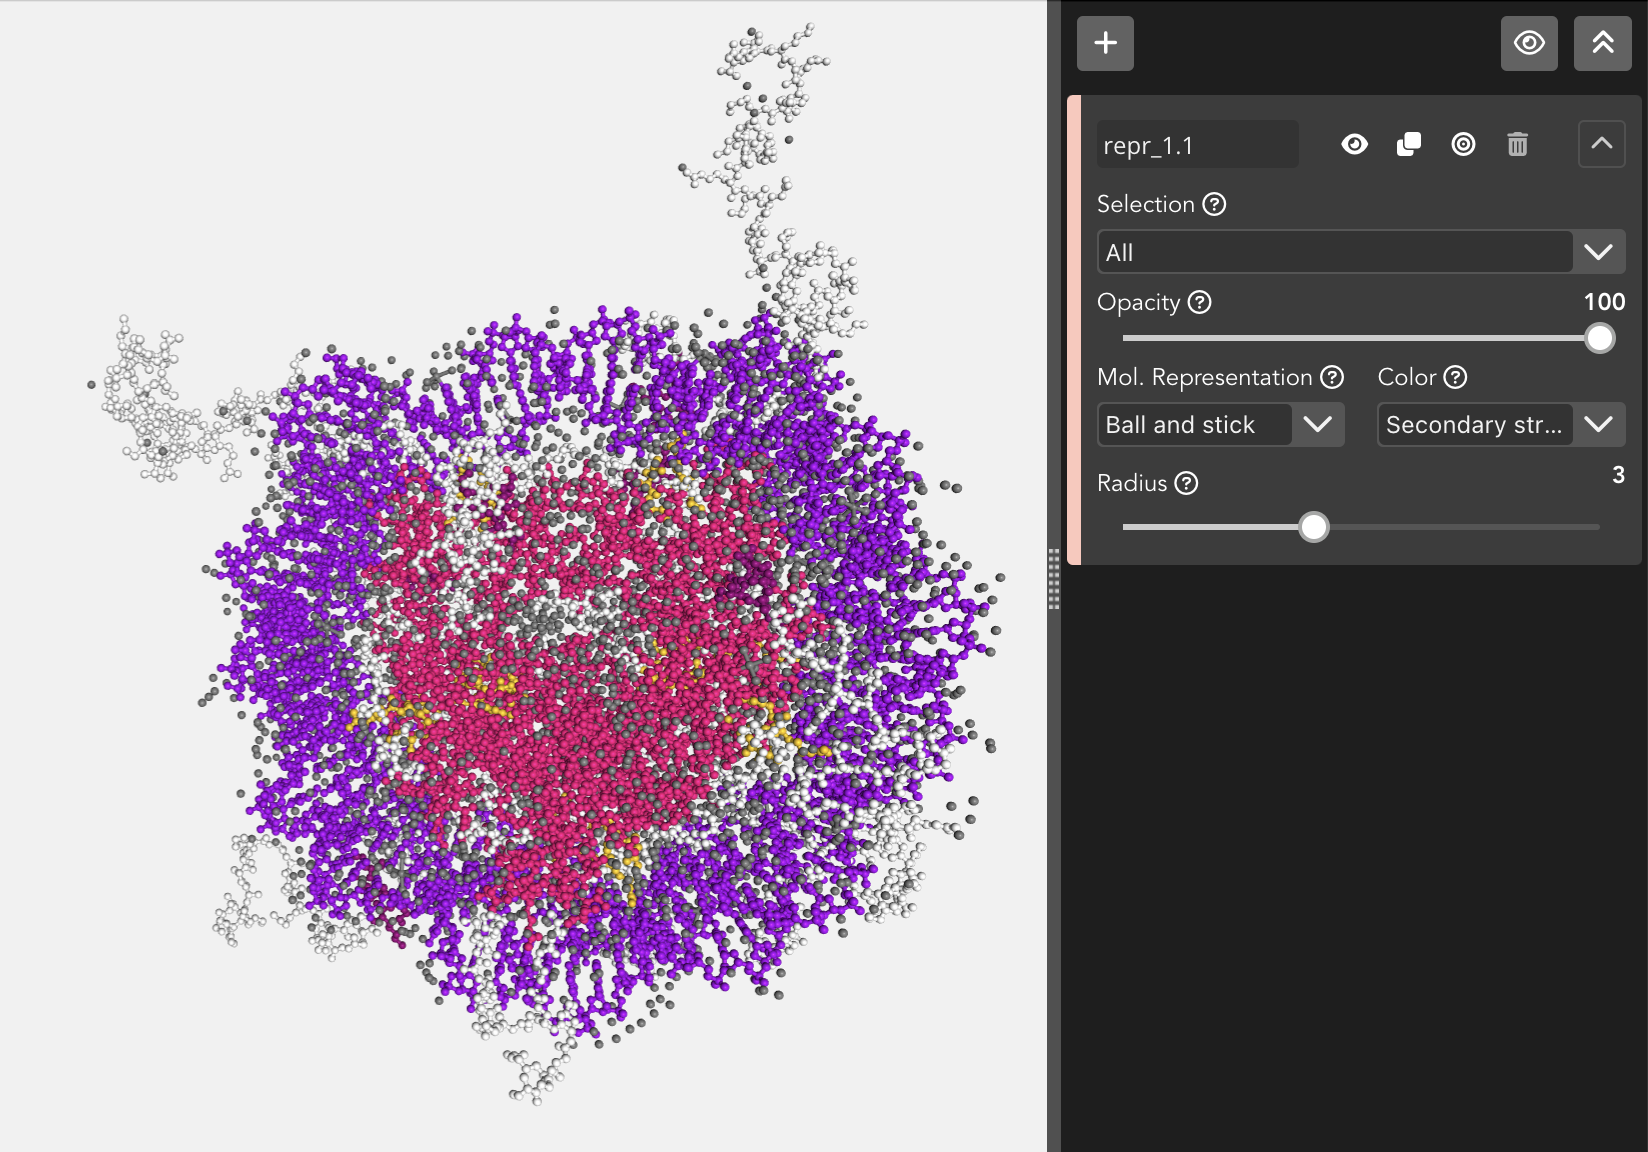
The Ball and stick representation allows to modify the radius of the balls (atoms) and the sticks (bonds).
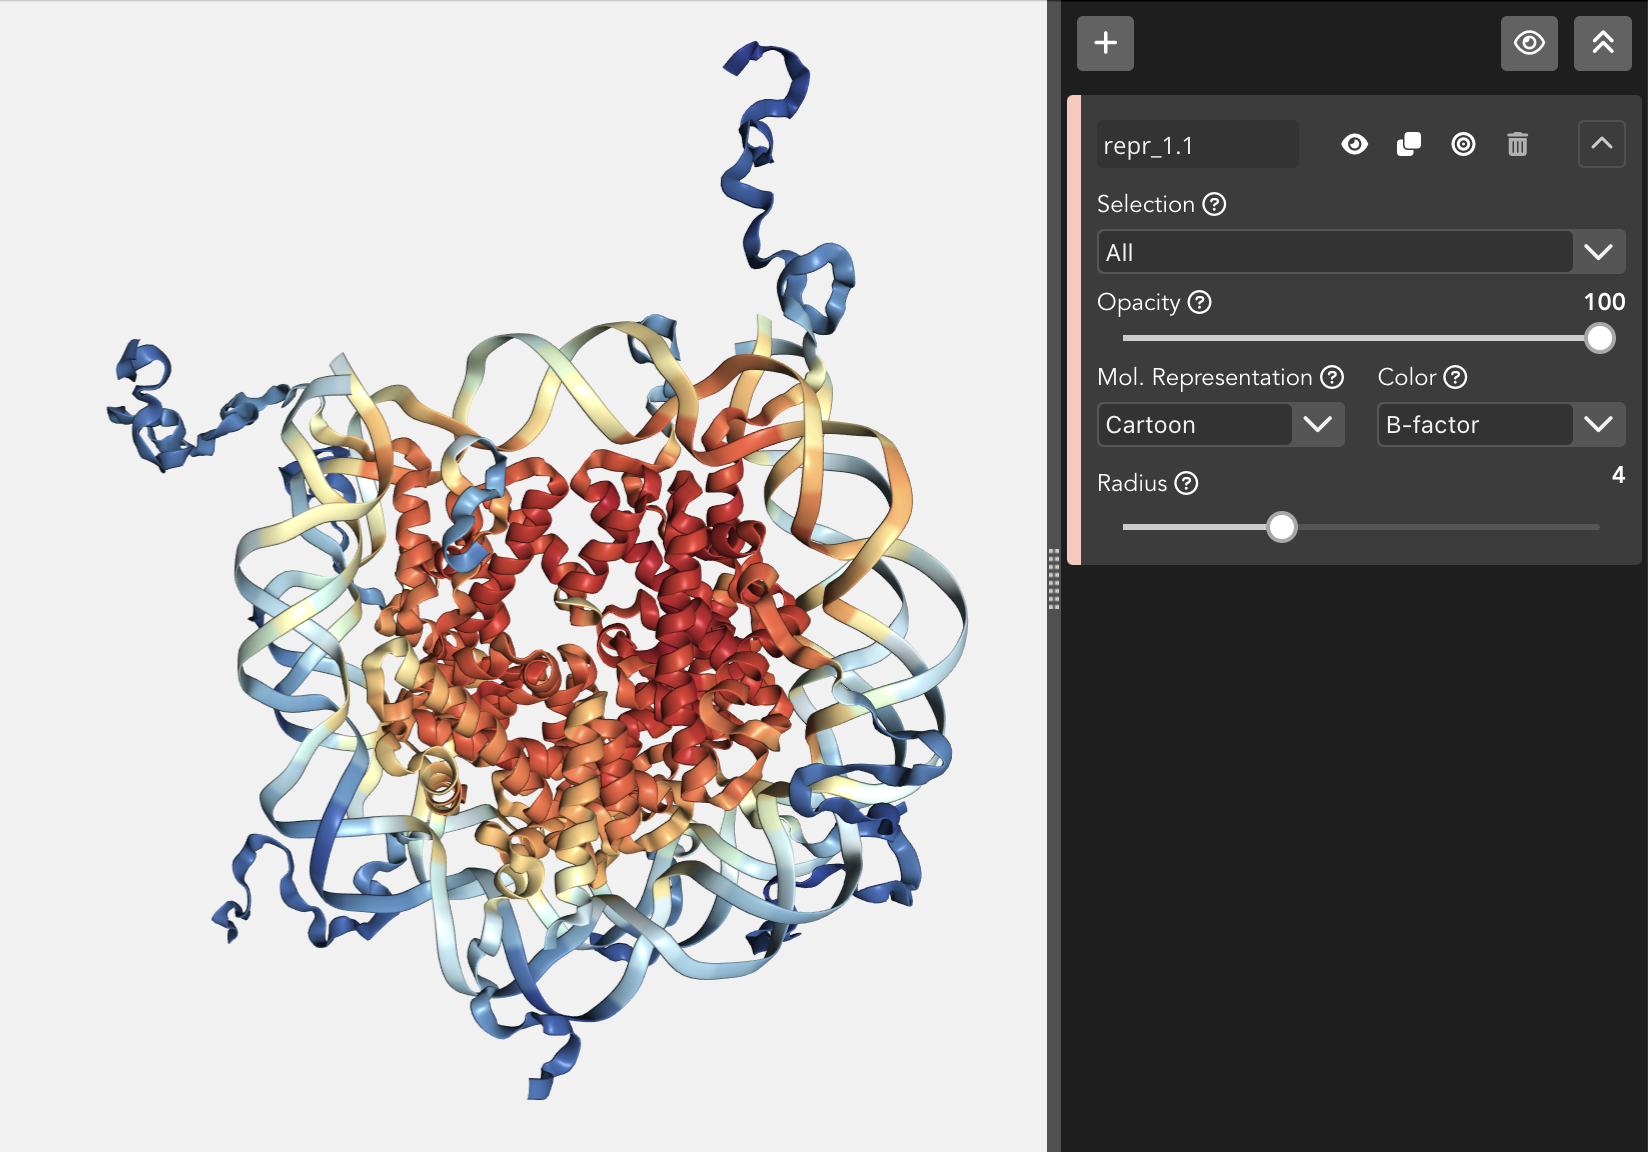
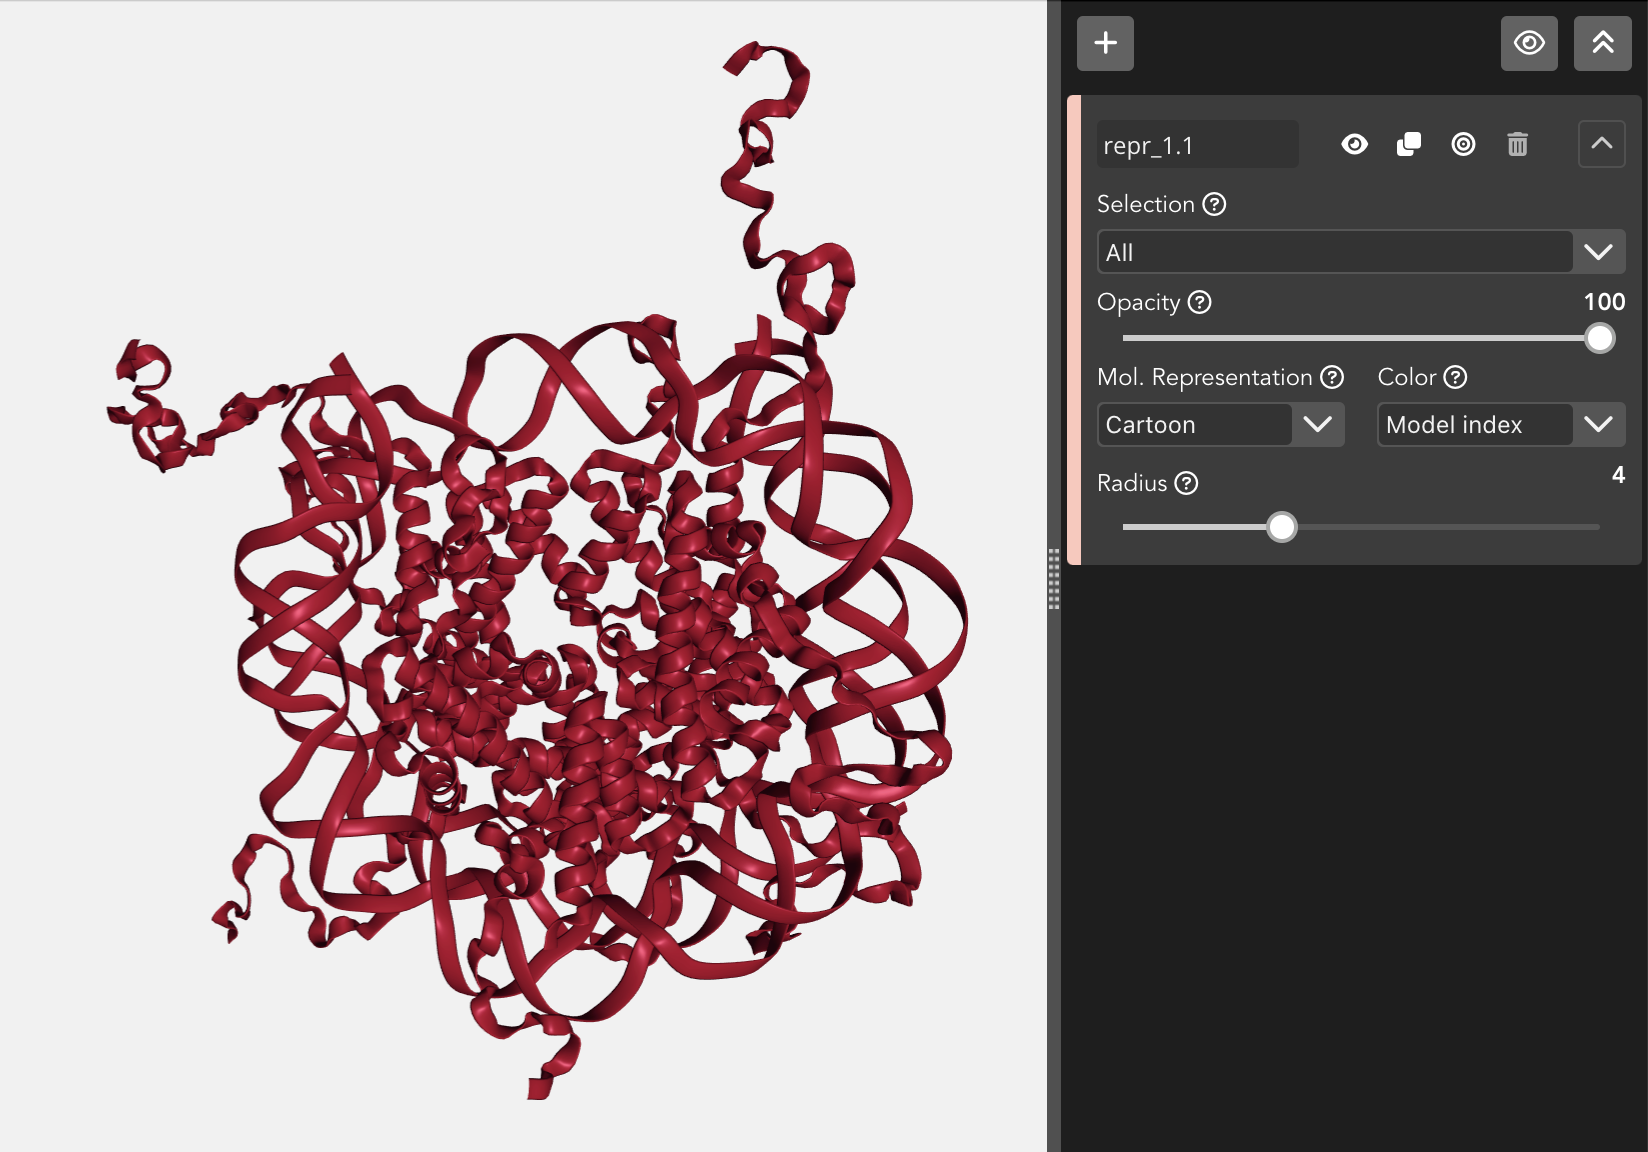
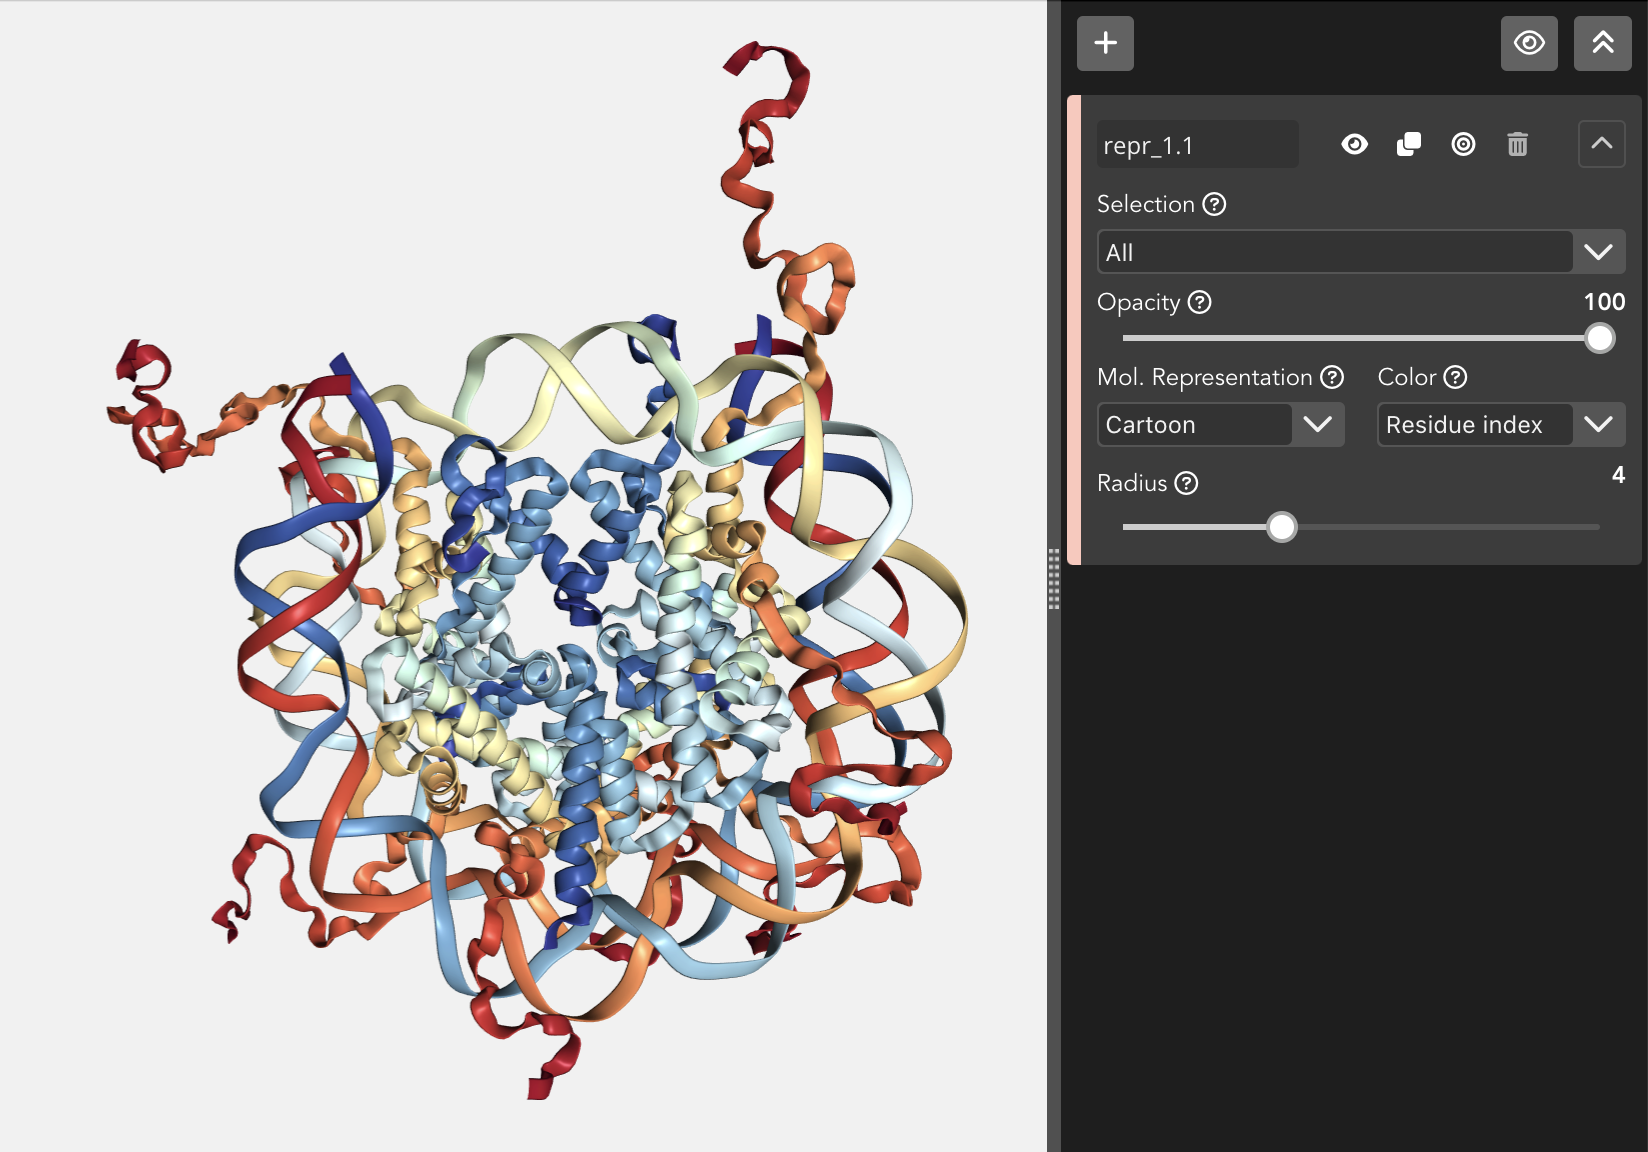
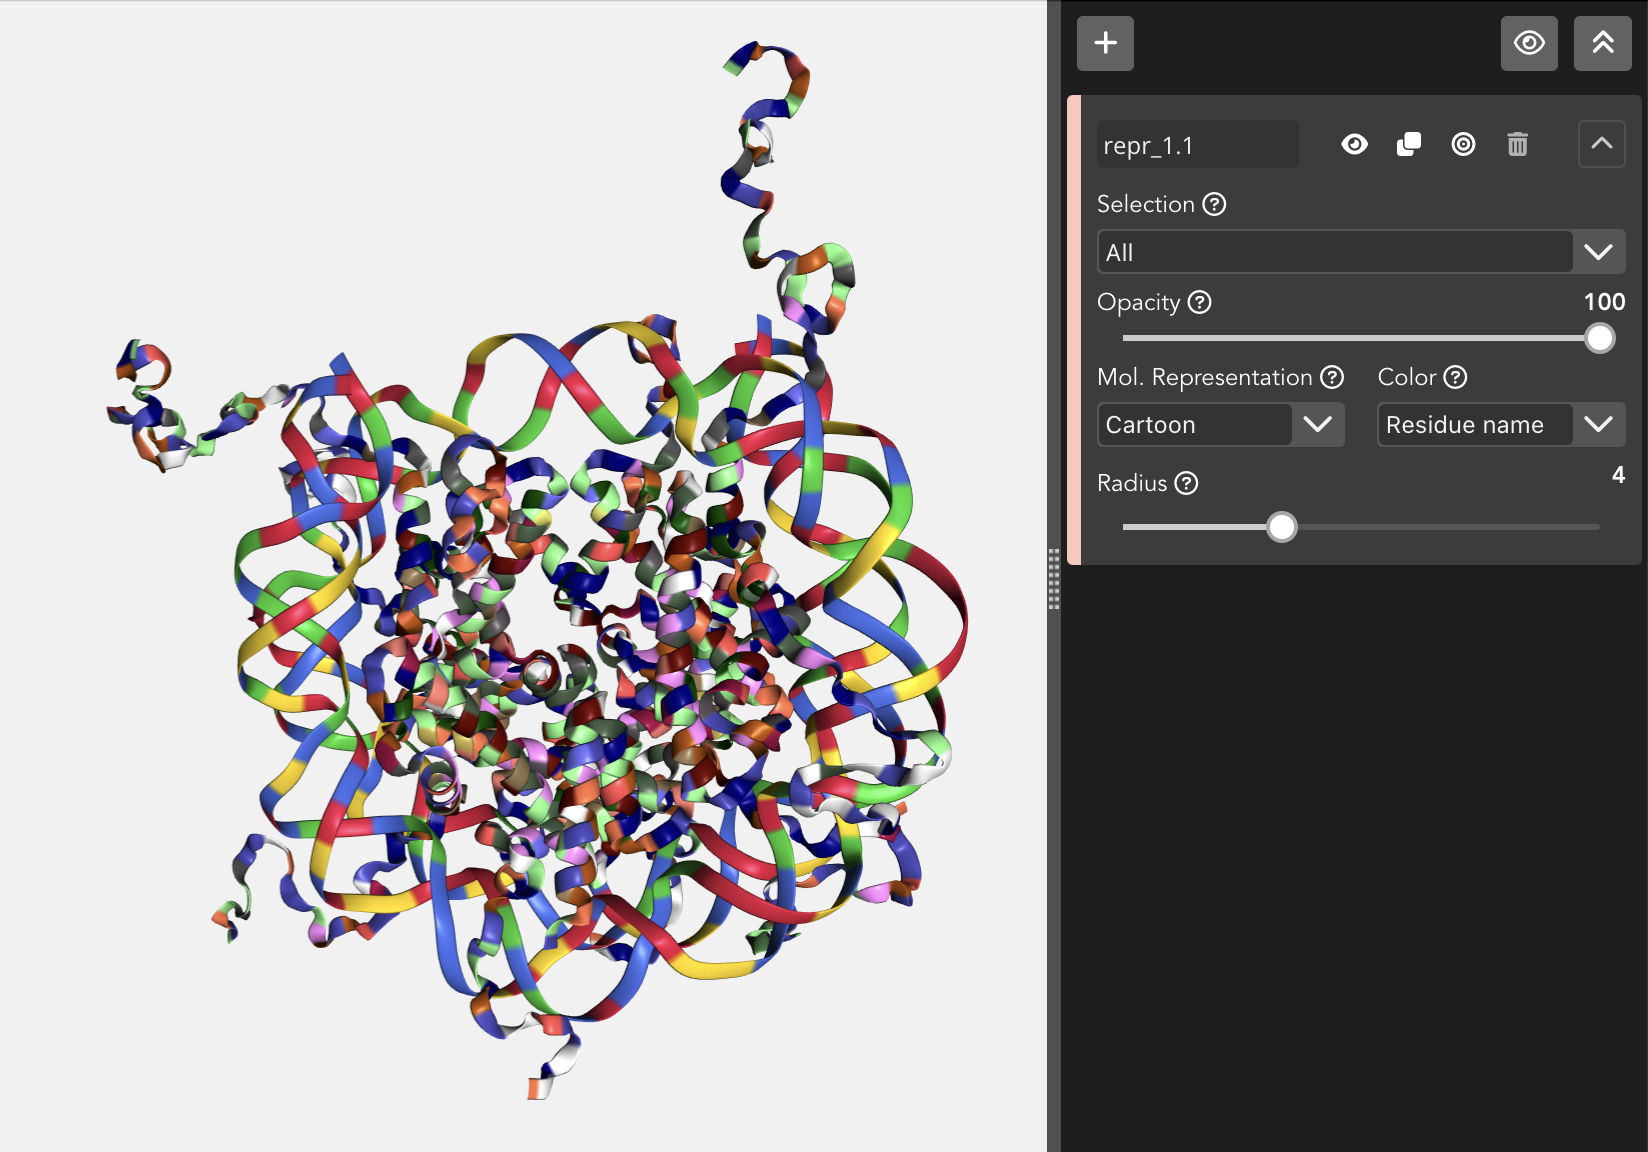
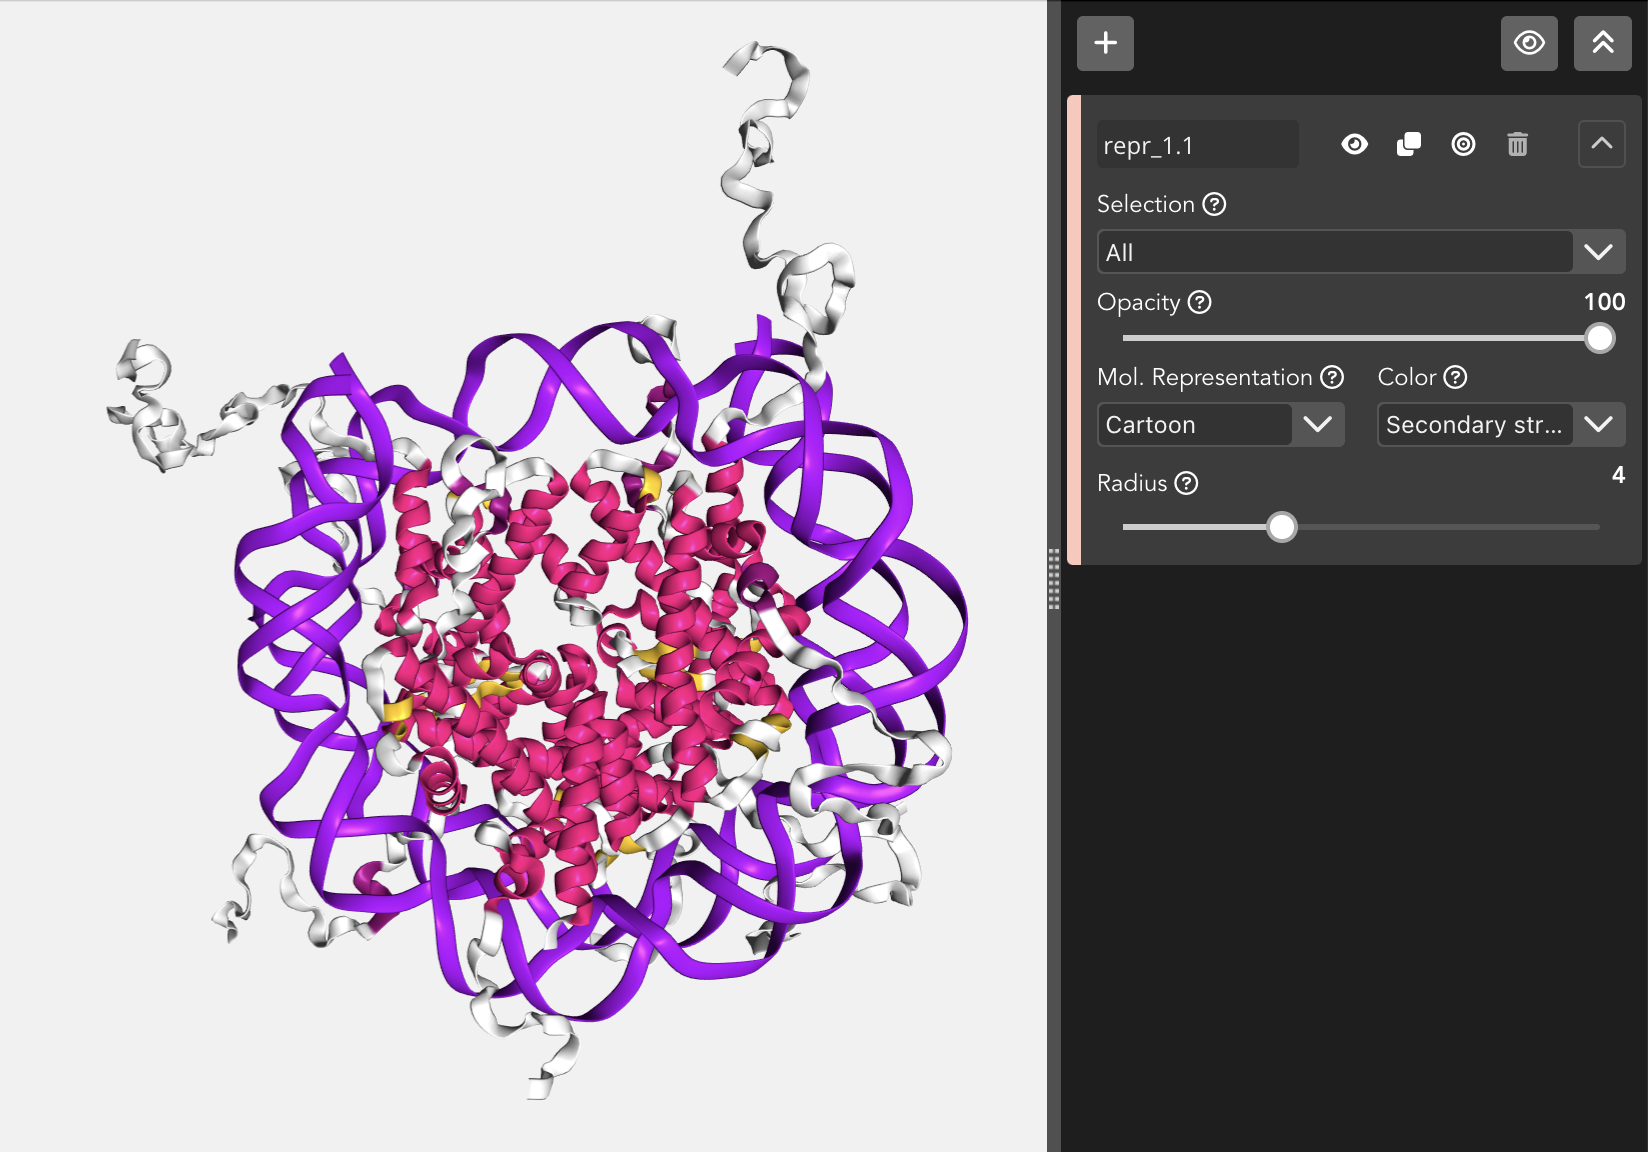
Cartoon
The main backbone atoms (see backbone) of successive residues in unbroken chains are connected by a smooth trace. The trace is expanded perpendicular to its tangent with an elliptical cross-section. The major axis points from .CA in the direction of the .O in case of proteins and from the C1’/C3’ to C2’/O4’ for RNA/DNA, respectively.

The Cartoon representation allows to modify the radius of the trace.
Due to a shortcoming of NGL Viewer, the cartoon and ribbon representations only can show four or more consecutive residues.
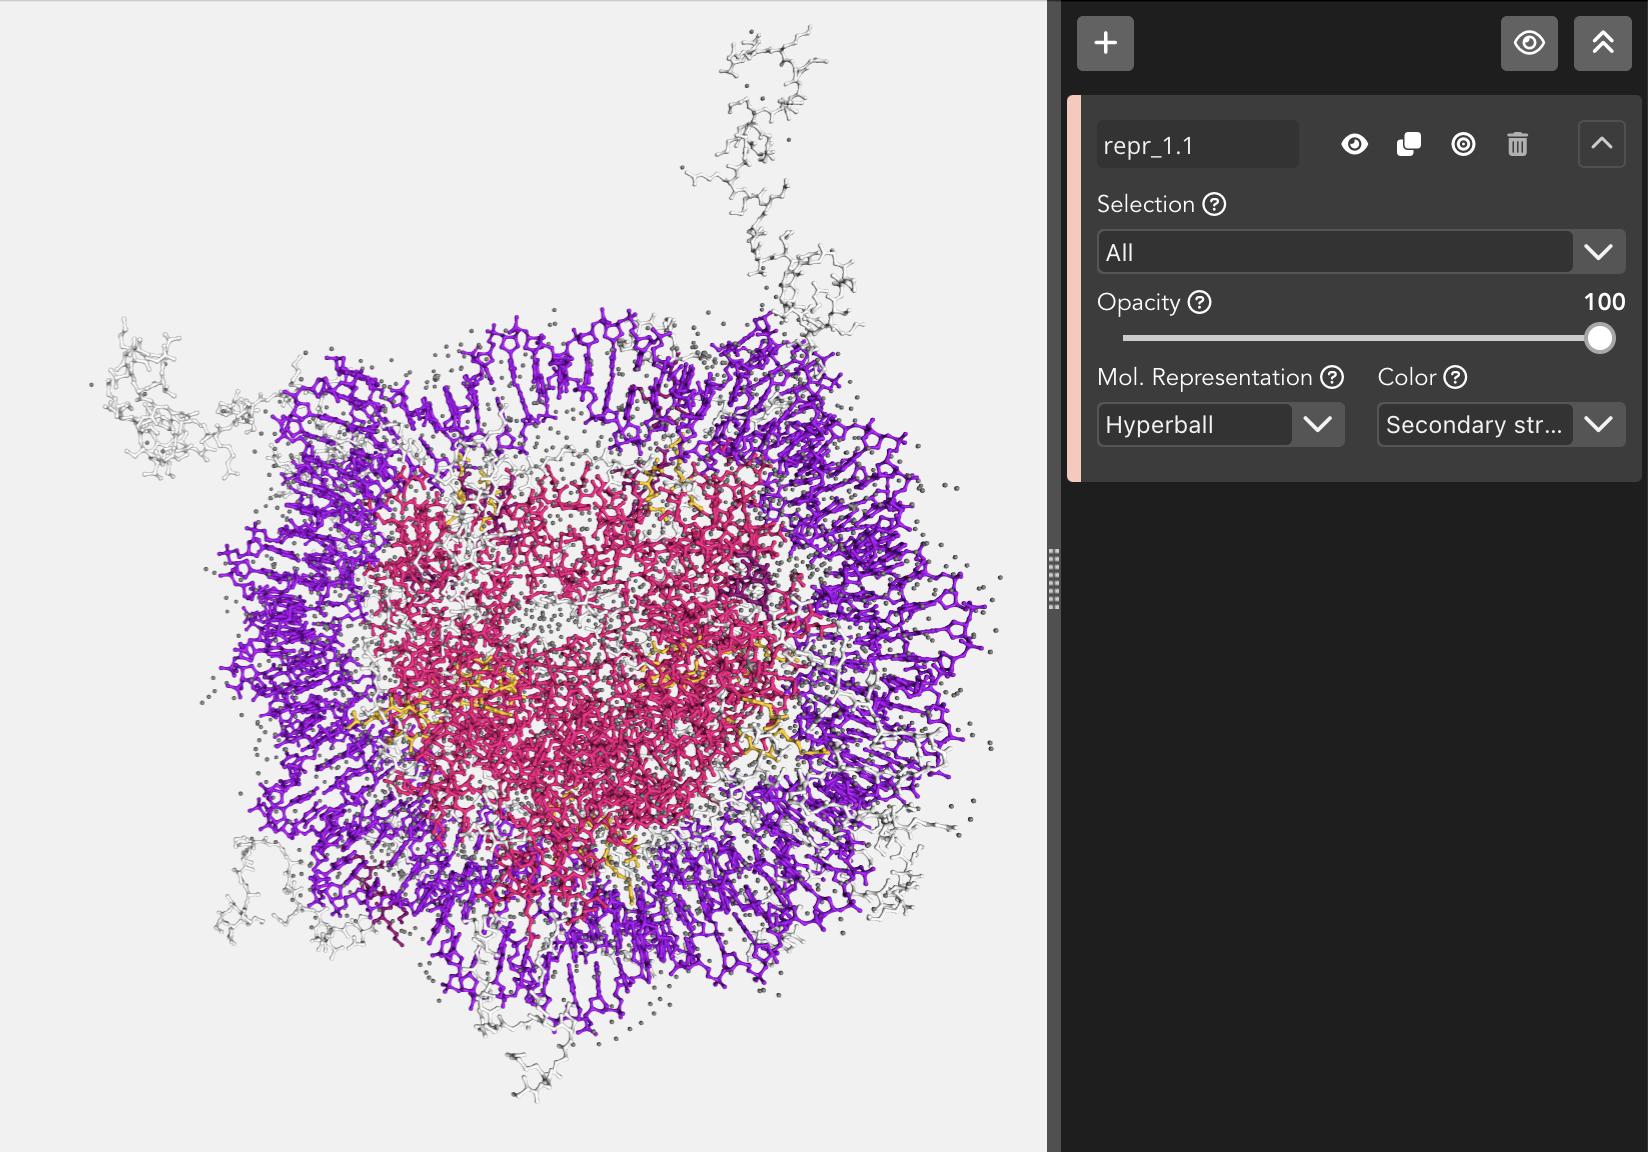
Hyperball
A derivate of the ball+stick representation (pioneered by HyperBalls project) in which atoms are smoothly connected by an elliptic hyperboloid.
Licorice
A variant of the ball+stick representation where balls and sticks have the same radius.

The Licorice representation allows to modify the radius of the balls (atoms) and the sticks (bonds).
Line
Bonds are displayed by a flat, unshaded line.

Ribbon
A thin ribbon is displayed along the main backbone trace.
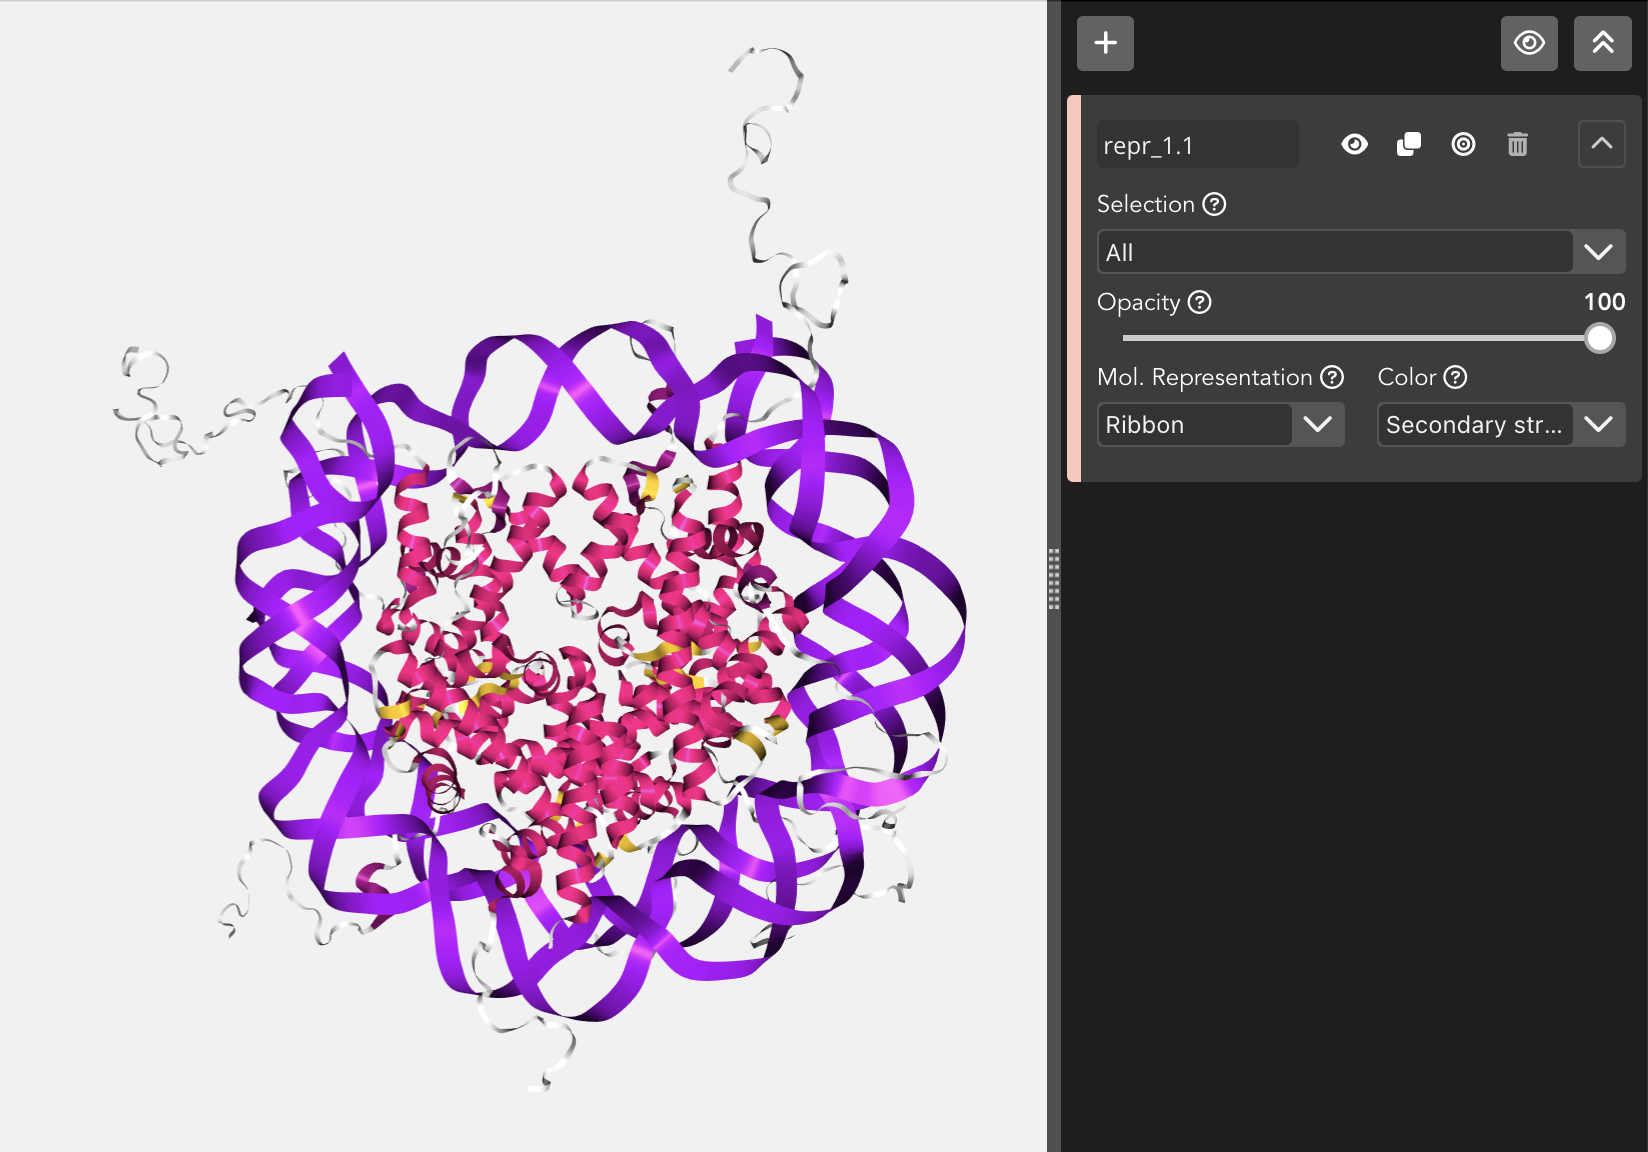
Due to a shortcoming of NGL Viewer, the cartoon and ribbon representations only can show four or more consecutive residues.
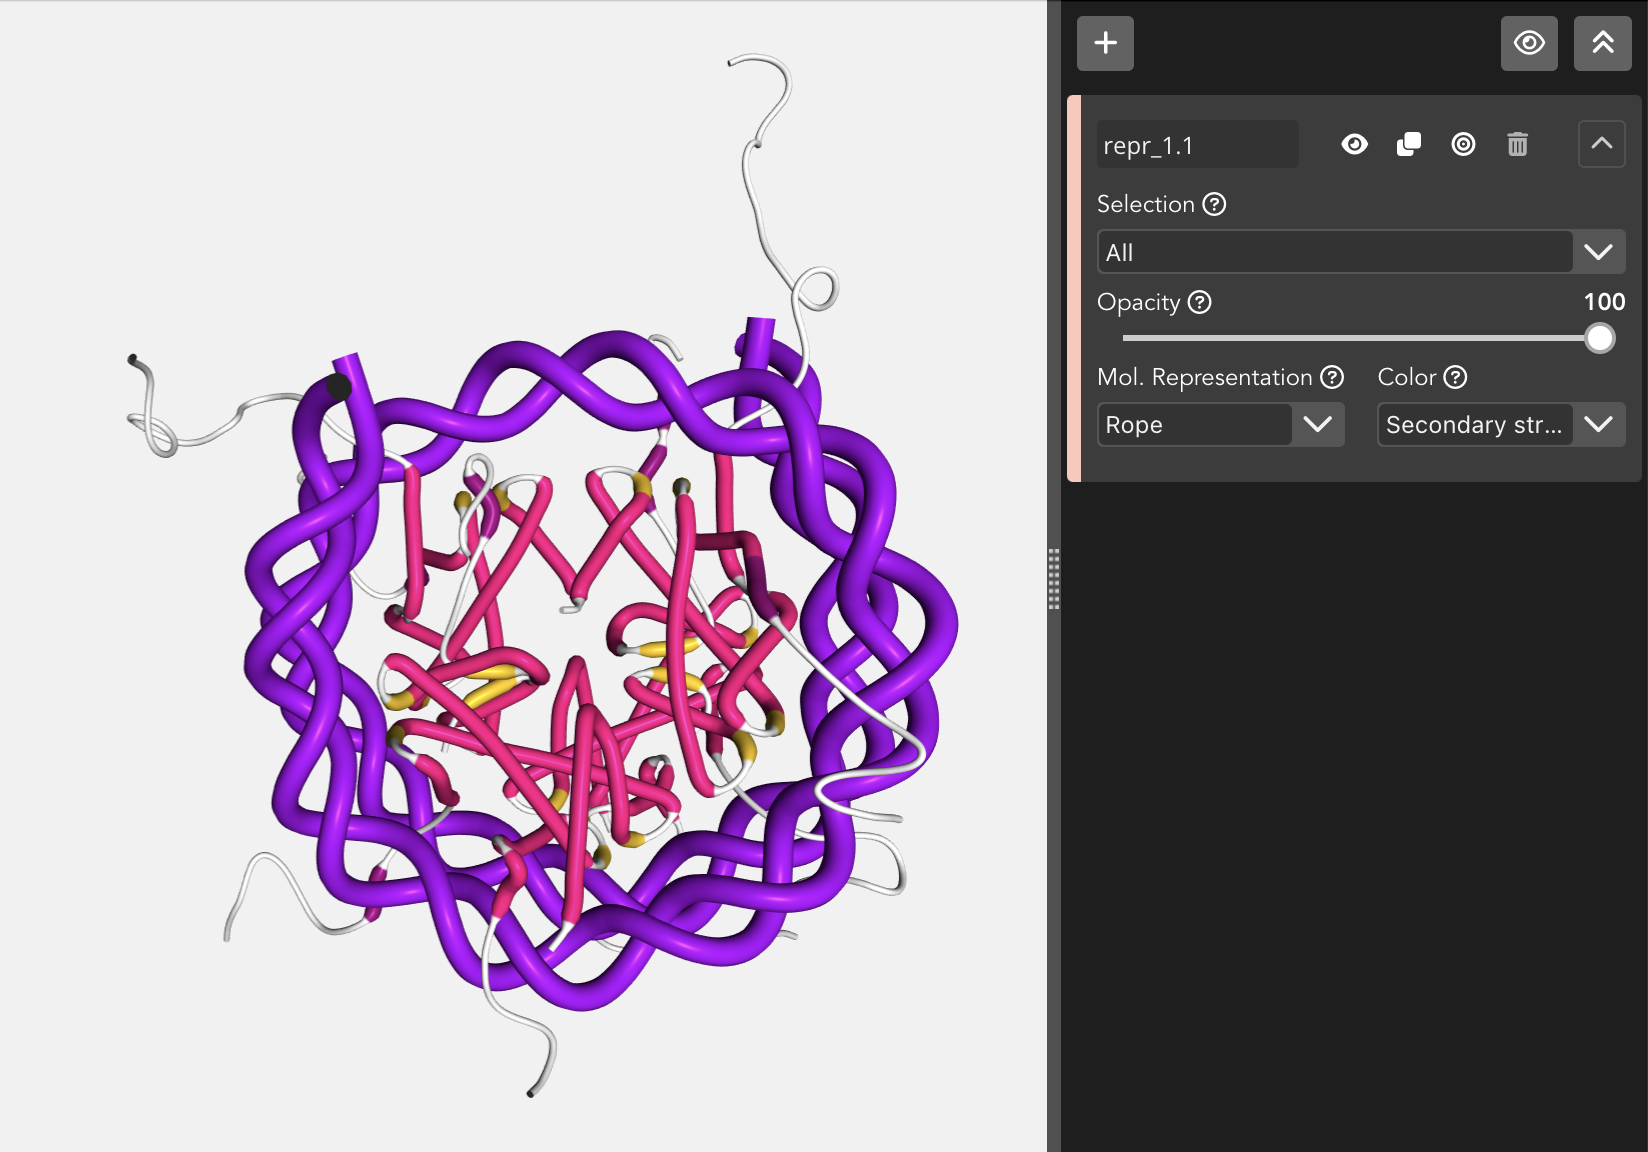
Rope
A rope-like protein fold abstraction well suited for coarse-grained structures. In this representation a tube follows the center points of local axes. The result is similar to what is shown by the Bendix tool .
Spacefill
Atoms are displayed as a set of space-filling spheres.
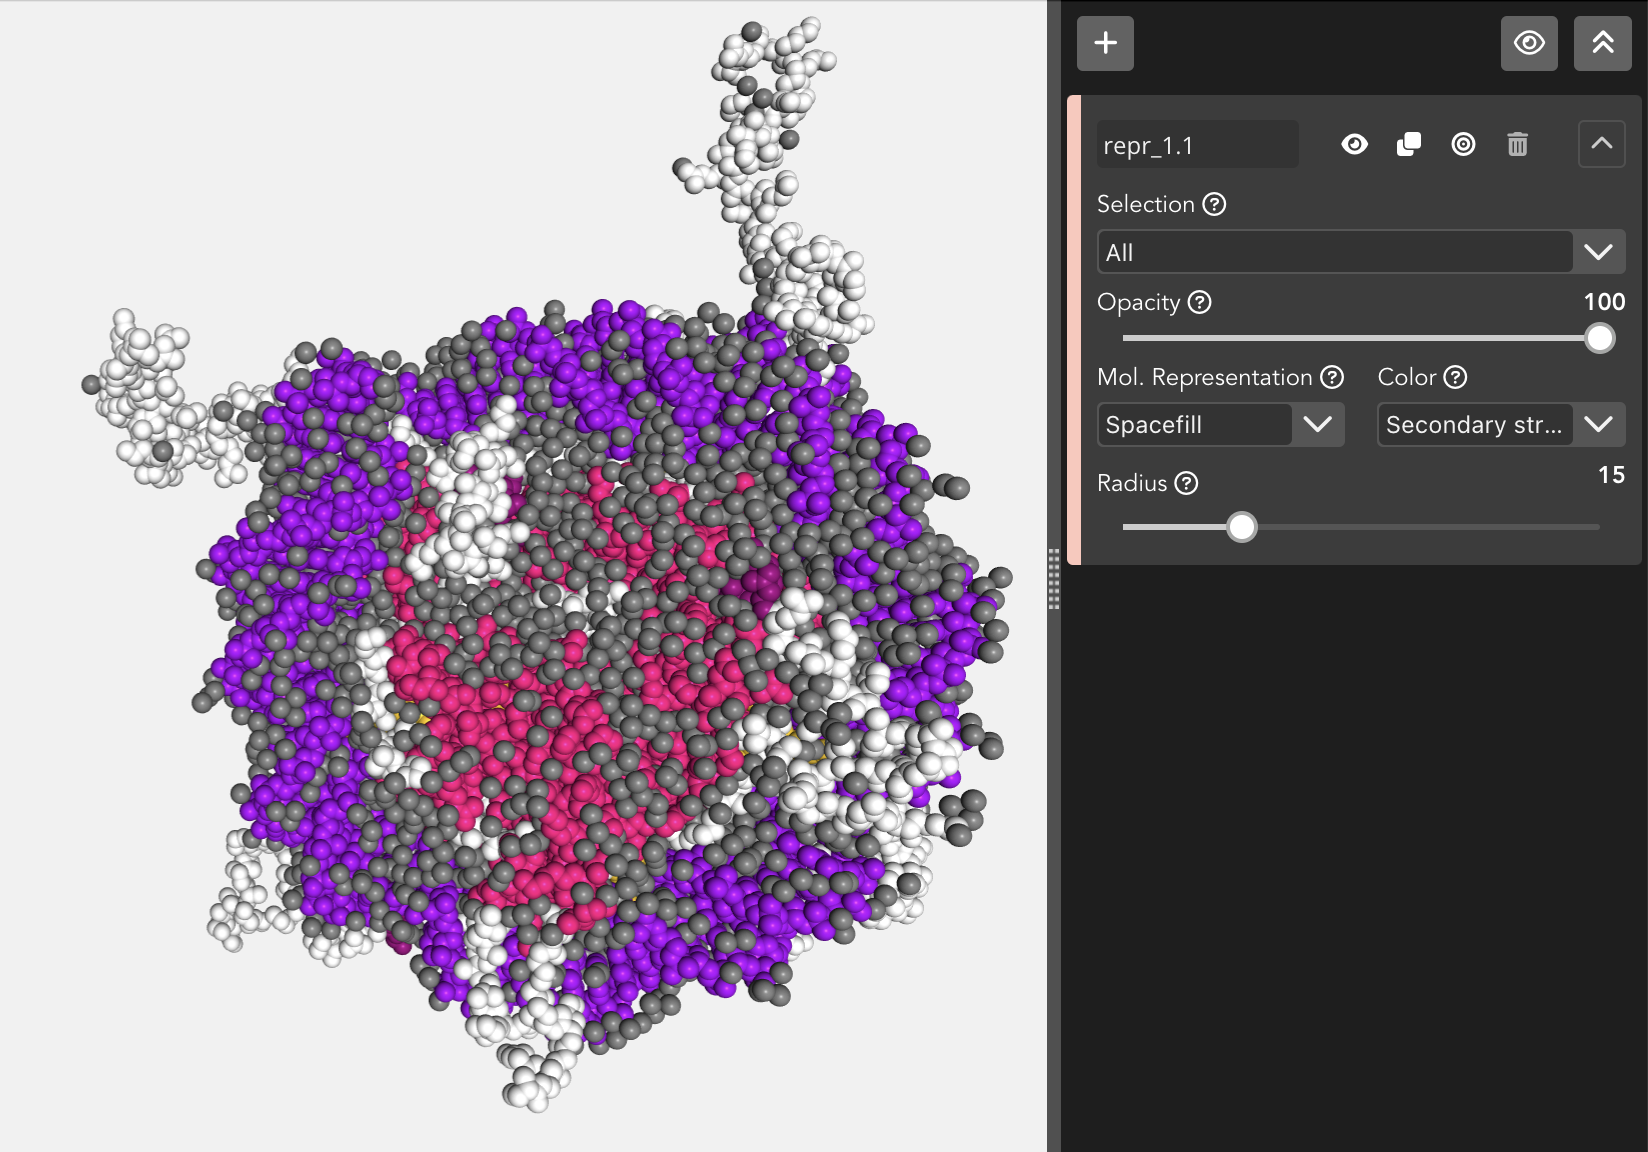
The Spacefill representation allows to modify the radius of the spheres.
Surface
Displays the molecular surface and its variants.

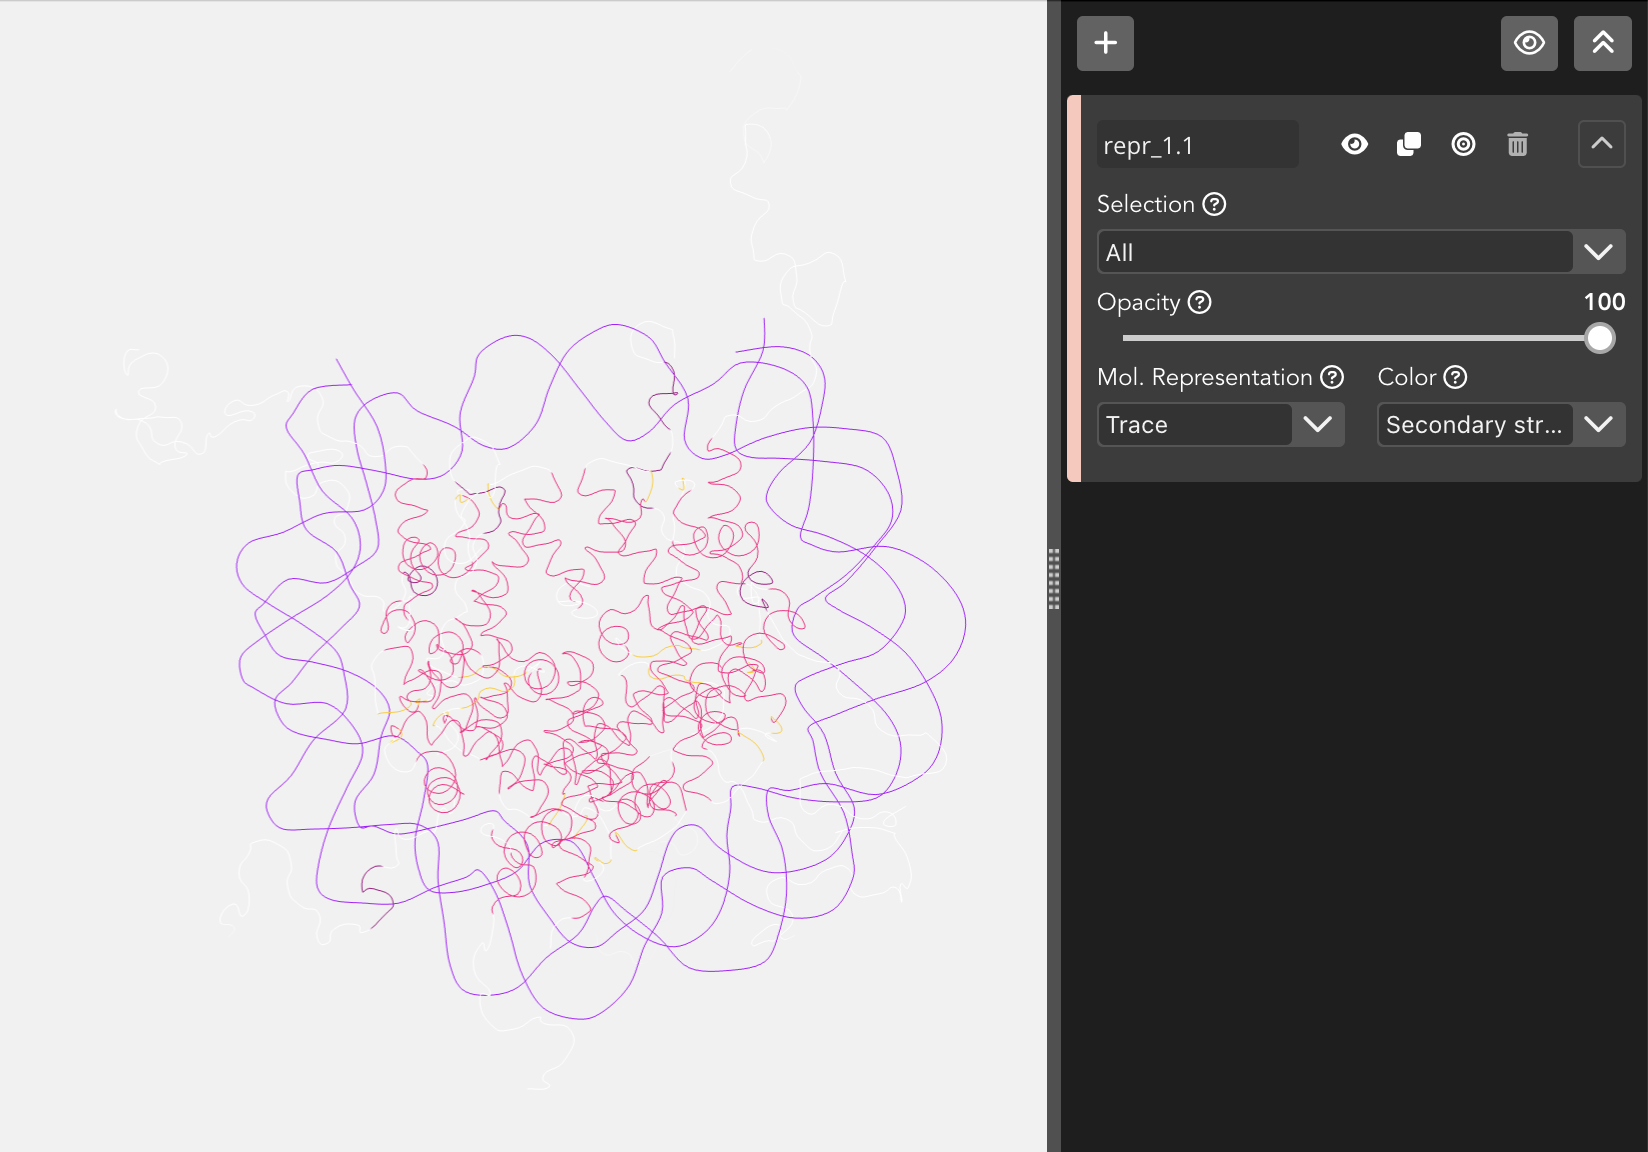
Trace
A flat, unshaded line is displayed along the main backbone trace.
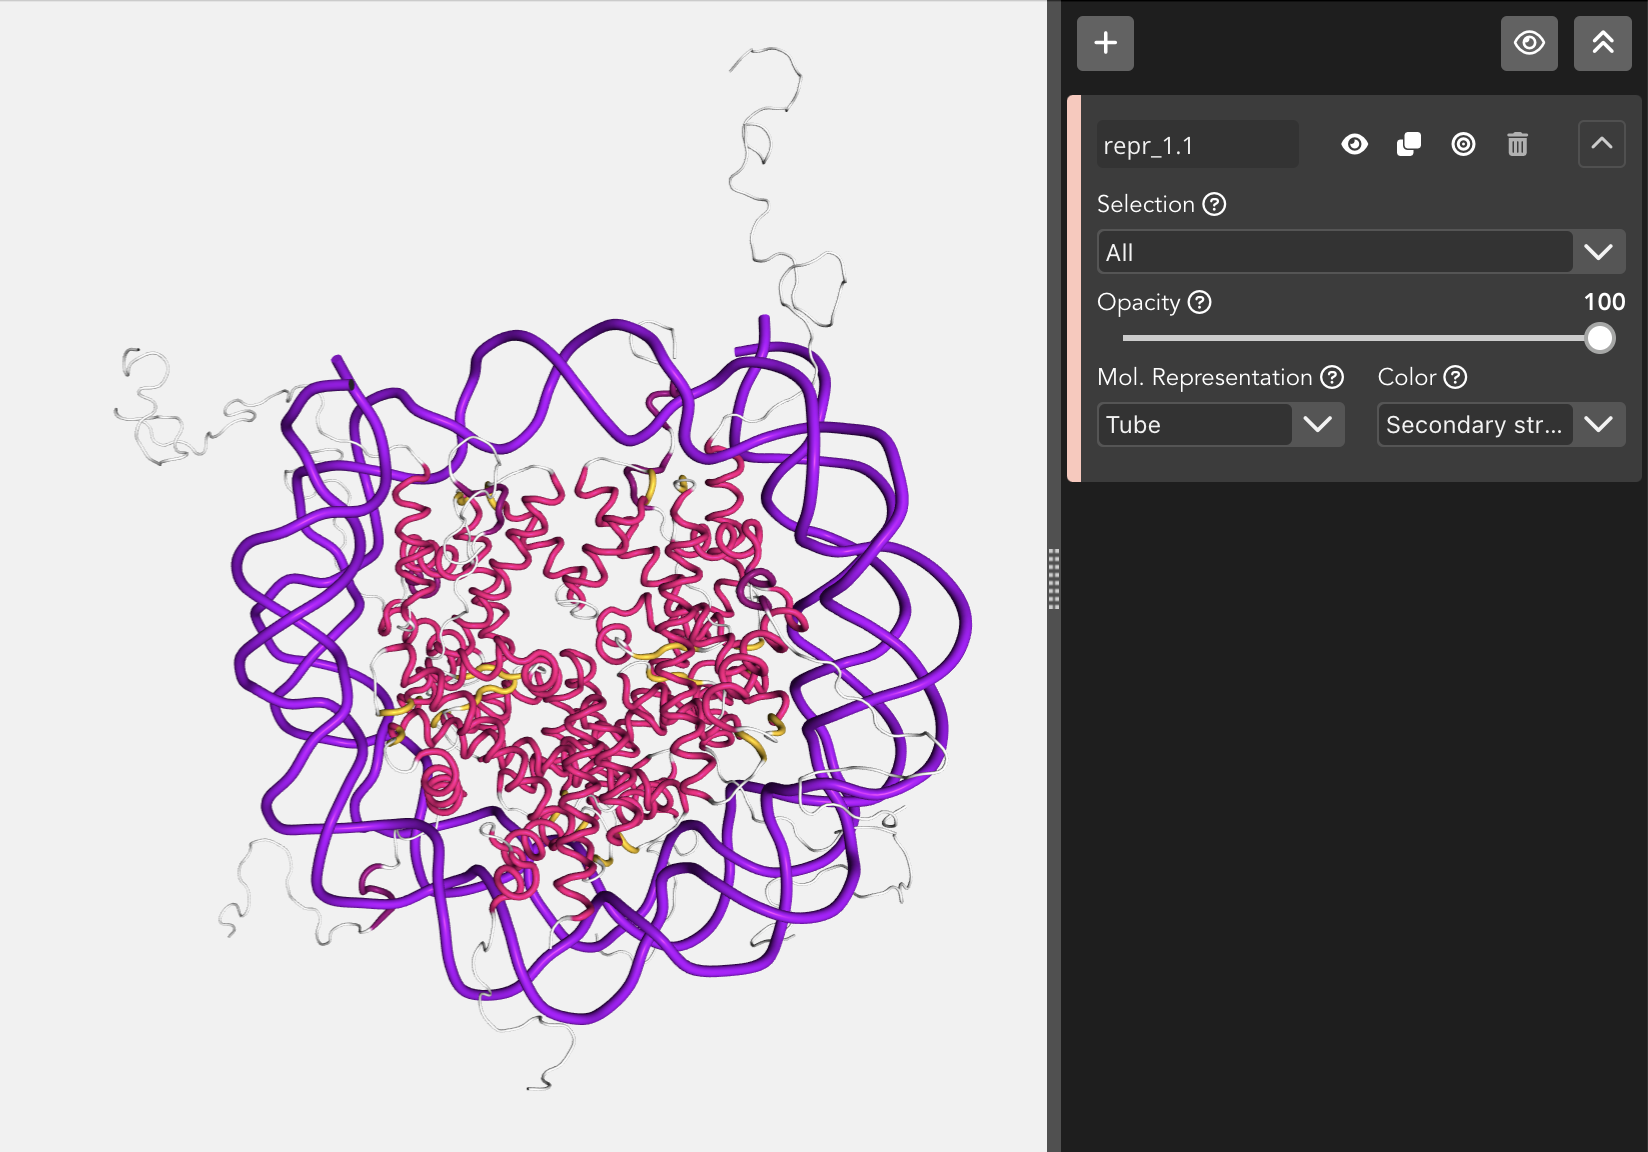
Tube
Essentially like cartoon but with the aspectRatio fixed at a value of 1.0.
Base
Simplified display of RNA/DNA nucleotides, best used in conjunction with a cartoon representation. Here, a stick is drawn connecting the sugar backbone with a nitrogen in the base (.N1 in case of adenine or guanine, .N3 in case of thymine or cytosine).

The Base representation allows to modify the radius of the sticks.
Color scheme
Each loaded structure can be displayed using a variety of color schemes:
Atom index
Color by atom index.

B-factor
Color by b-factor.
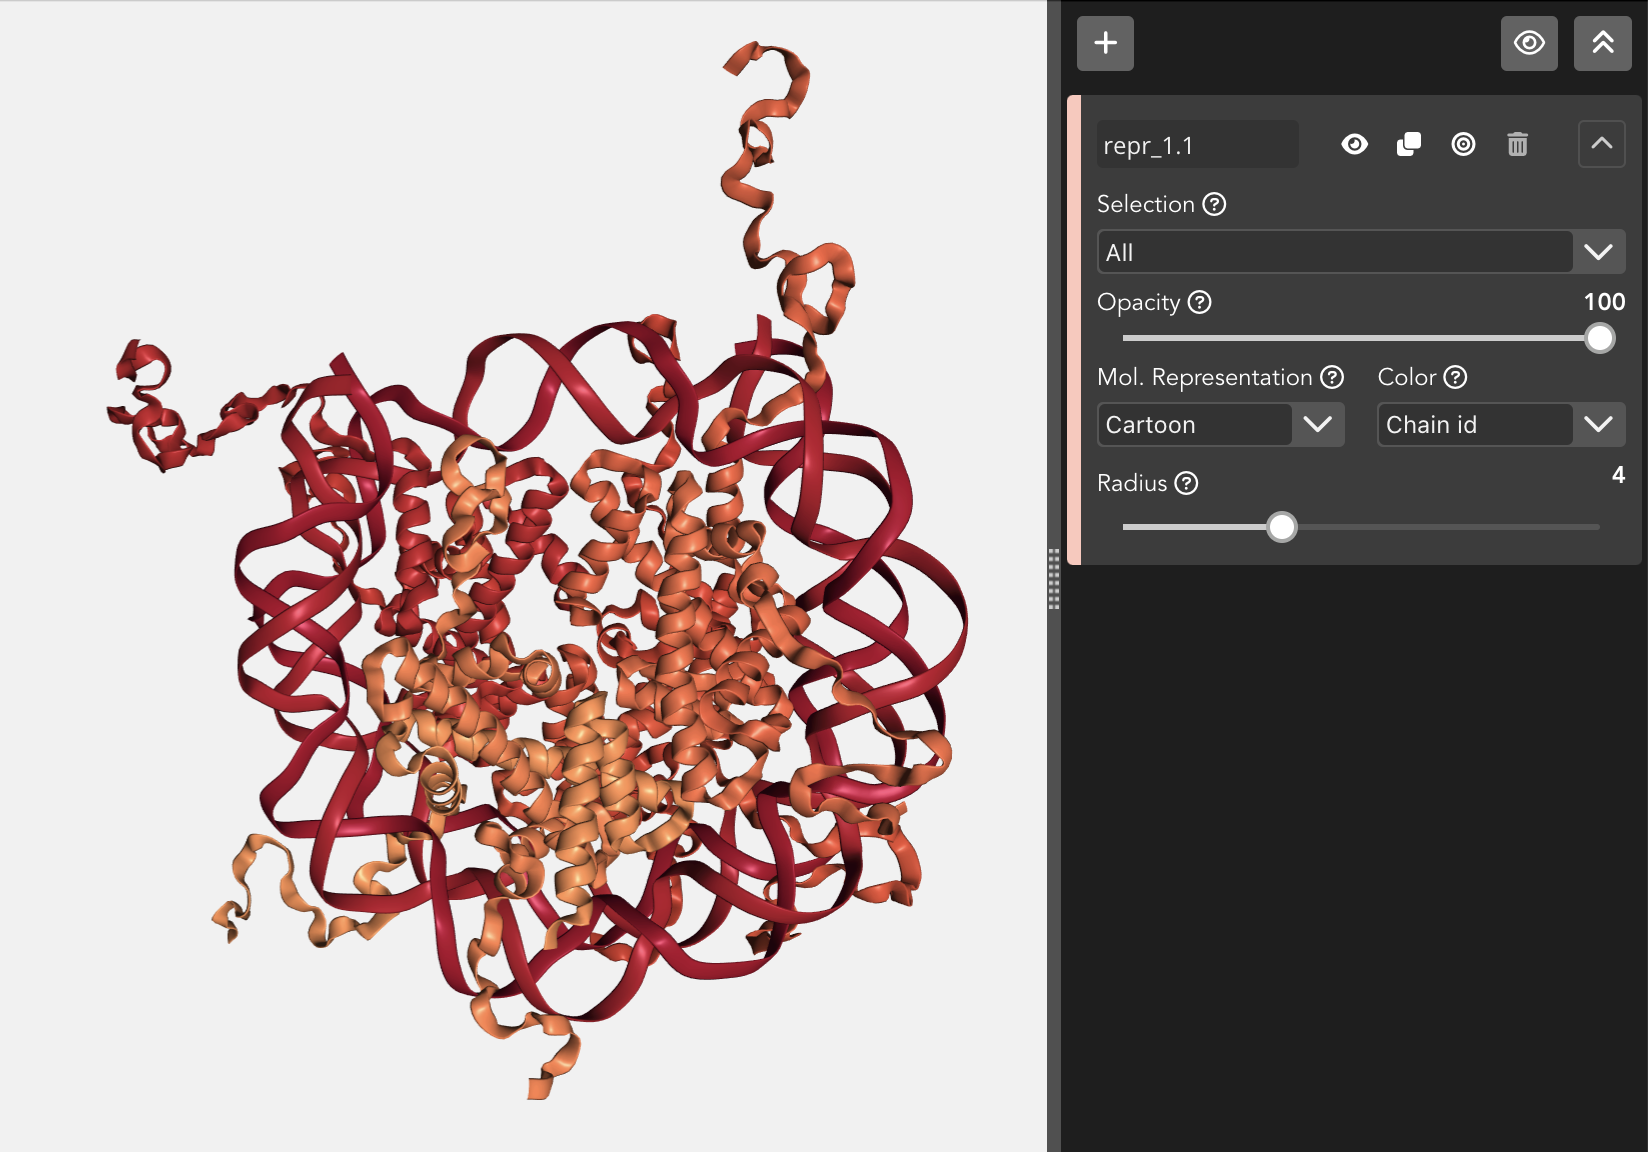
Chain id
Color by chain id.
Chain index
Color by chain index.

Element
Color by chemical element.
Hydrophobicity
Color by hydrophobicity.

Model index
Color by model index.
Random
Color atoms / molecules randomly.

Residue index
Color by residue index.
Residue name
Color by residue name.
Secondary structure
Color by secondary structure.
Uniform
Color by uniform color selected from the color picker that appears at right of the dropdown menu when this option is selected.


Radius
Through this slider, the radius can be modified in the next molecular representations:
Backbone
Ball and stick
Cartoon
Licorice
Spacefill
Base
Trajectories

When working with a project with a topology and a trajectory and selecting a clip or a keyframe in the Timeline, the above editor module appears on the Representations area.
By default it’s disabled. That means that, when we start a new project with a trajectory, this trajectory is not applied to the structure until the Play trajectory for this clip switch button is enabled.
Enable / Disable trajectory
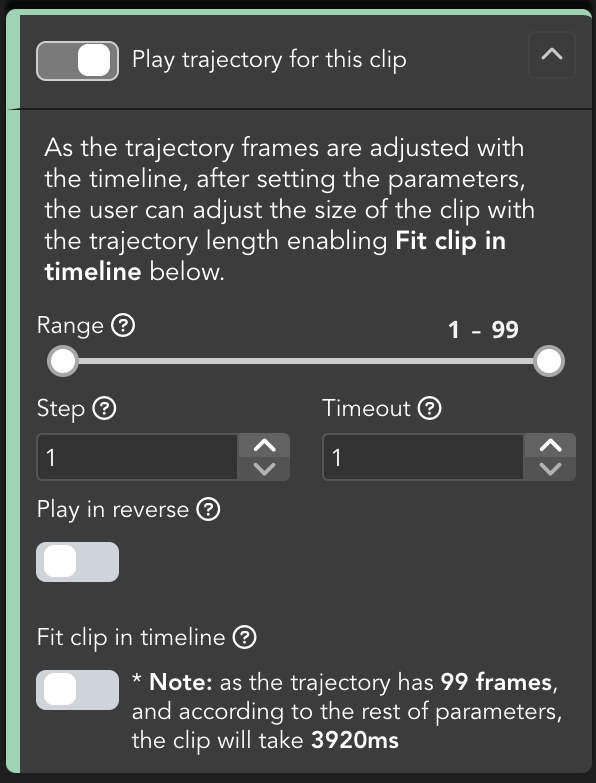
When enabling the Play trajectory for this clip switch button, the editor expands all the settings. From now on, the trajectory is active for the clip selected in the Timeline and we can check it by clicking for example the Play button in the Timeline,
Range
Initially set from the first to the last frame of the trajectory, defines a range of frames with which the trajectory will be played.
Taking into account that for long trajectories, the modification of the range can be annoying, a couple of features have been introduced:
On the one hand, both of the numbers at the right top of the range are editable. Click on both of them in order to introduce the desired frame.
On the other hand, range values can be adjusted via keyboard with the following shortcuts:
⌘/Ctrl + ⌥/Alt + 1 decreases initial frame
⌘/Ctrl + ⌥/Alt + 2 increases initial frame
⌘/Ctrl + ⌥/Alt + 3 decreases final frame
⌘/Ctrl + ⌥/Alt + 4 increases final frame
For more tips, see the tips section. For more shortcuts, see the shortcuts section.
Step
Defines the number of frames between playing steps.
Timeout
Timeout between playing frames (40ms per unit).
Play in reverse
If enabled plays the trajectory backwards.
Fit clip in timeline
Adjust the selected clip in Timeline size with the trajectory length. Beside the switch button there is a text that, dynamically, updates the number of frames of the trajectory after modifying the range and the time of the clip in ms after modifying step and / or timeout.
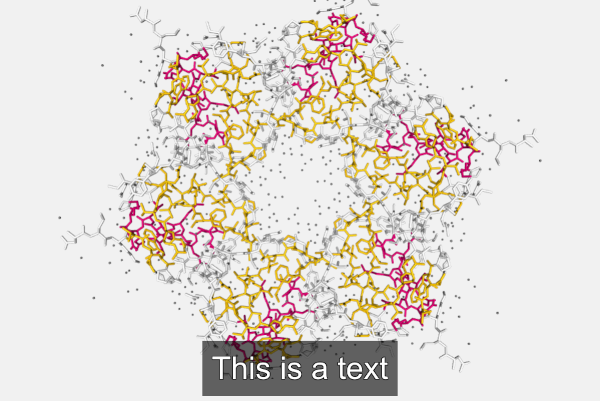
Descriptions
As explained in the Descriptions section, users can add descriptive texts to the Timeline. Clicking on a keyframe or a description in the Timeline, the above editor module appears on the Representations area.

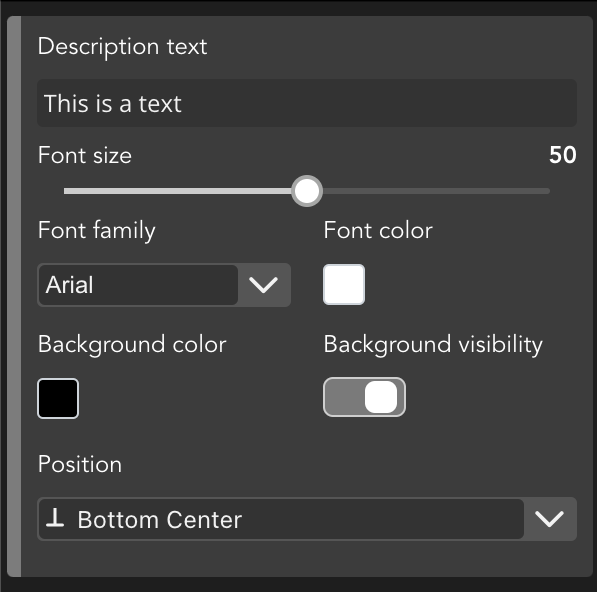
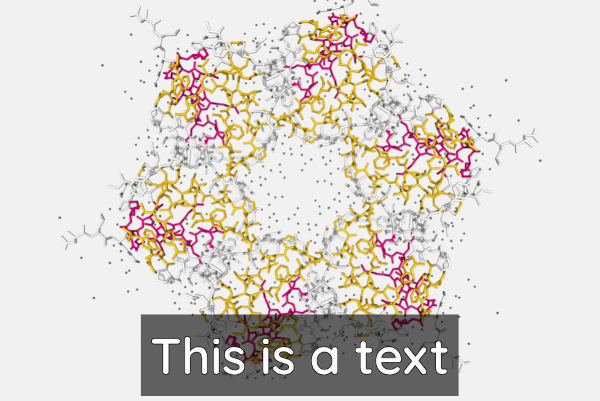
Description text
This text box allows to edit the text shown in the Timeline.
Font size
Font size of the text shown in the Timeline.

Font family
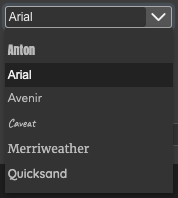
Font family for the text shown in the Timeline.
List of available fonts:
Font Color
Font color of the text shown in the Timeline.

Background Color
Background color of the text shown in the Timeline.
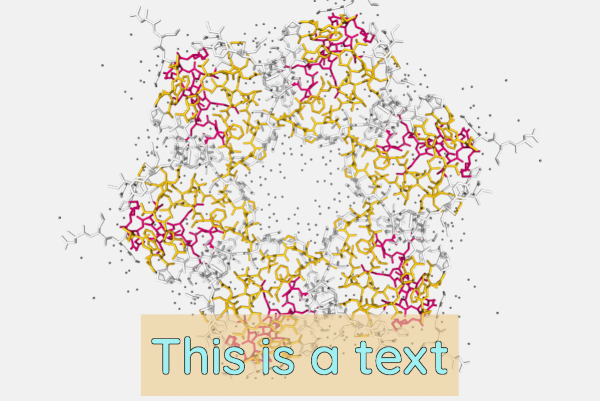
Background Visibility
Wheter or not to show the background of the text shown in the Timeline.

Description position
Placement of the text in the stage.
There is a list of available predefined positions. The first parameter is about vertical position while the second is about the horizontal one:
Top Left
Top Center
Top Right
Middle Left
Middle Center
Middle Right
Bottom Left
Bottom Center
Bottom Right
Status Bar

Status bar
The status bar is at the bottom of the application. It can be enabled / disabled via menu (View > Status Bar)
Tips

This section of the status bar shows tips depending on the area of the application where the mouse is located. There are tips for:
Stage
Tools
Controls
Timeline
Splitter
Project status

This section of the status bar shows the current status of the project: either the last time it was saved or a prompt warning that the project hasn’t been saved yet.
Version

This section of the status bar shows the current version of the application.
Theme

Clicking on this section of the status bar the application theme will toggle between dark and light. This option can be toggled as well via menu (View > Light Theme or View > Dark Theme)
Shortcut: ⌥/Alt + ⇧ + H